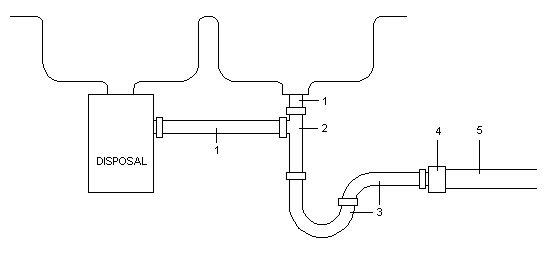
Note there are actually two types of piping involved here. Items 1-3 are "drainage system" components, and they typically are 1-1/2" OD, either chrome-plated brass or white plastic, with very thin walls and connected together with compression fittings. The line going out, item 5, is Schedule 40 or DWV PVC piping, which is 1-1/2" ID, fairly thick wall, and glued together with PVC cement. Item 4 is an adapter to connect these otherwise incompatible types of piping. The adapter is glued into the end of the PVC pipe and provides a compression fitting for connecting the P-trap outlet.
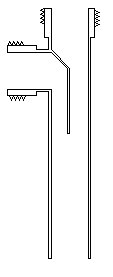
This drainage arrangement sucks. It works, it just doesn't work very well. The problem is with the "end outlet tee", item #2 in the illustration above. Here's what the innards of this part look like:
There is another type of drain for a pair of sinks called a "center outlet tee", in which the drains from both sinks turn towards each other and there's a tee in between with an outlet downward. It has the same problem.
Fortunately, it's really easy to fix this bodge. The idea is to provide each sink with its own P-trap, then plumb the drain lines together back at the heavier pipe into the wall using a wye connector instead. Wye connectors have big open passages through them. To illustrate:
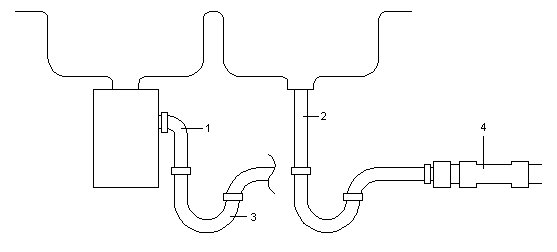
Item 2 is a tailpiece -- but you'll need a longer one than the one that was in there, so you need to buy a new one. They typically come in 6" and 12" lengths, so make sure the one you buy is long enough; they are intended to be cut to length anyway. Alternatively, you can keep your old tailpiece and buy an "extension", but as long as you're in there the new tailpiece is the neater way to go.
Item 3 is a new P-trap assembly, essentially similar to your old one.
Item 4 is a 1-1/2" wye. It doesn't look like it in
this illustration
because it needs to be installed in a flat plane so all connections to
it are horizontal.
Here's a photo of the finished assembly:

Remember that you will need two adapters for this assembly; you might be able to reuse your old one, but they're cheap and buying two new ones while you're shopping might be a good idea. Note that some adapters are made to be glued onto the end of a pipe, while others are made to be glued directly into a fitting such as the wye used here. If you get the first type, you will need two short pieces of 1-1/2" pipe to attach them to the wye.
So, while you're at the store, you'll need to buy a disposer elbow if you don't have one, a tailpiece, a P-trap, two adapters, a small can of PVC primer and a small can of PVC glue. You will also need a hacksaw if you don't have one. All of this adds up to something like ten bucks.
The real challenge, of course, is making sure it will all line up. Whenever you cut off a PVC pipe, you need to make sure you're leaving about an inch for gluing a new fitting on. And when connecting up P-traps, you need to make sure that all the parts can reach each other. Note that the outlet end of a P-trap is also intended to be cut off if it's too long. Also remember that it's a simple matter to loosen a disposer's mounting lock ring and rotate the disposer around, which will realign its outlet connection.
When you get all this connected up, the drains will work
much better
since there is a full pipe diameter drain from each sink.
As an aside: The reason that the drain from the sink
to the right in the photo has two 45° bends in it rather than a
straight drop to the P-trap is to reduce noise. Water falling
more than a foot into the standing water in a P-trap makes a splashing
sound; by putting these jinks in the drop, the water runs down the side
rather than falling straight, and the sound is somewhat baffled from
coming back up the pipe. Functionally it does nothing, however; a
straight pipe will work just fine.