MAYTAG A104 TRANSMISSIONS --
ORBITAL vs. HELICAL
In the 1980's, Maytag top-load washing machines had two drive
belts underneath the machine, one driving the water pump and one
driving the drum and agitator through a transmission. These
are commonly referred to as "2-belt models", and after Whirlpool
bought out Maytag they were sold under both names.
The transmission works as follows: When the motor is turning
the pulley clockwise (as viewed from the bottom), the brake is
released and the entire transmission and drum start rotating,
eventually very rapidly for the spin cycle. When the motor
is turning the pulley counterclockwise, the brake remains engaged
and the transmission and drum remain stationary while the
transmission converts the motor's spinning into an oscillation
motion for the agitator. Meanwhile, the water pump also gets
rotated both directions; Counterclockwise it just foams up the
soapy water inside its plastic housing, but clockwise it pumps the
water from the tub out through the drain hose.
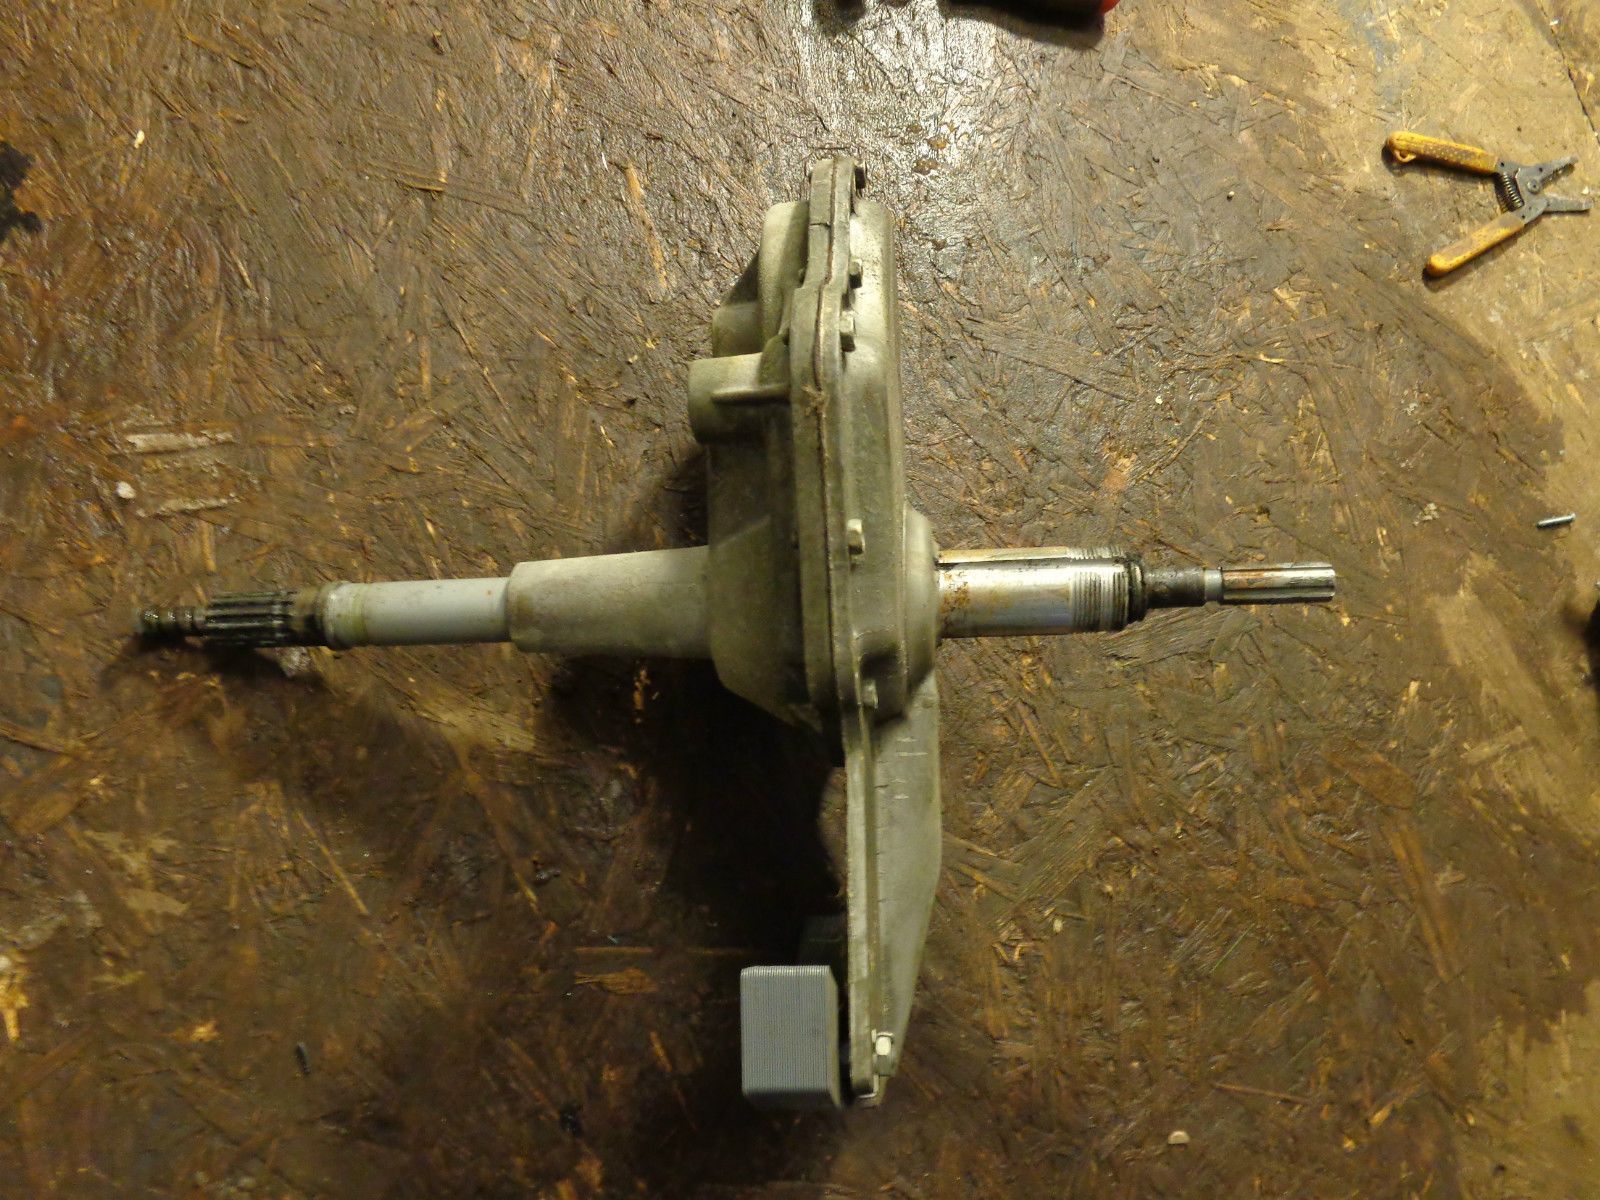
The early transmission type is now referred to as the "helical" or
"Newton" transmission, and it's a big clunky-lookin' thing with a
massive counterbalance:
This was superceded by the simpler, more compact "orbital"
transmission, part number AP4373301 or 6-2097750:
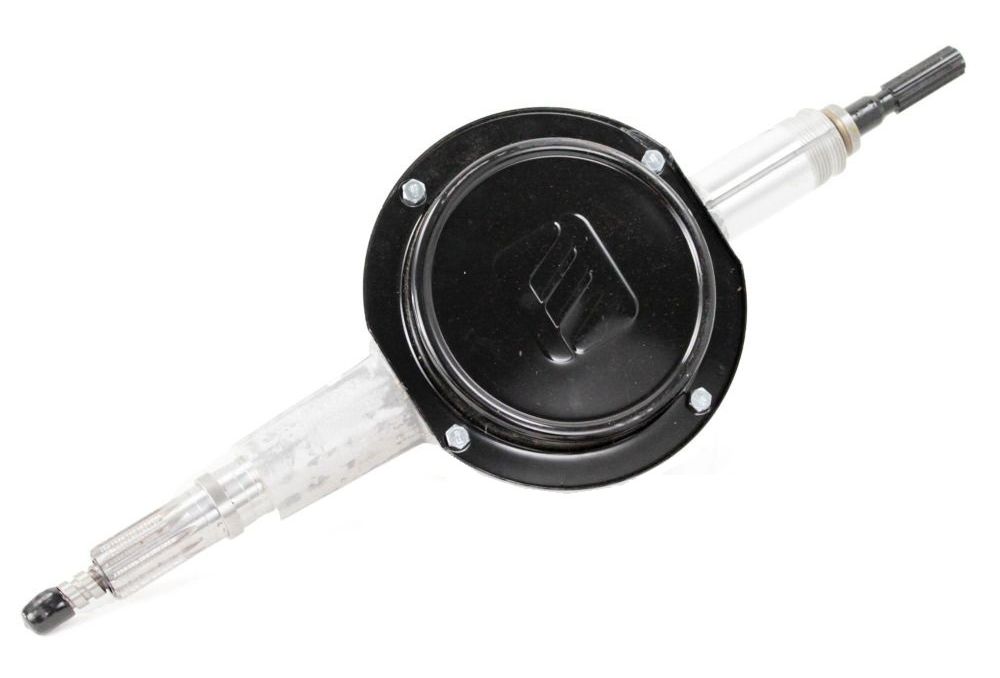
Early versions of the orbital transmission had 8 bolts on that
cover, but evidently somebody figured out that 4 would do the job.
The helical transmission went out of production and is no longer
available; you can't buy parts for it other than the gasket.
However, there are so many laying around in shops and junkyards
that people have found ways to keep them working.
Measuring from one end to the other, these transmissions measure
23 inches. Note that there are similar transmissions --
orbital, anyway -- that measure 25" end to end but otherwise
appear virtually identical; the shaft and spline are just sticking
farther out the bottom end.
If you have a helical transmission that has gone bad, you can buy
an orbital transmission to replace it. It will fit perfectly
and work fine.
AGITATION: In agitation mode, the center agitator in
a top-loading washing machine turns back and forth. There
are those who put great stock in how far it turns back and
forth, with 180 degrees (a half a turn) seeming to be the break
point; those that turn farther than 180 degrees supposedly clean
clothes better than those that make shorter oscillations.
Speed Queen, maker of arguably the best washing machines on the
market today, proudly advertises that their agitator turns 210
degrees. If you buy this argument, you will want to know
that the Maytag helical transmission will turn the agitator a bit
more than 180 degrees; I didn't measure it, but it looks like
perhaps 190 degrees or so. The orbital transmission, on the
other hand, turns the agitator considerably less than 180
degrees, perhaps 100 or 110 degrees or so. Yeah, barely more
than a quarter turn.
The orbital transmission will also agitate faster.
Good or bad? My wife and I opened the lid and jammed the
safety button and watched the agitation from the orbital, and it
looked OK to us. It seems to generate an interesting
rollover of the clothes, moving toward the center and then
downward along the agitator, presumably because the agitator is
pushing the water and clothes outward at the bottom.
PLASTIC GEARS: Both the helical and the orbital
transmissions look like massive blocks of metal from the
outside. However, the two gears inside the orbital
transmission are plastic. The gears inside the helical
transmission (there are several) are metal except for the bottom
pinion which is plastic. Plastic gears may or may not be a
sign of poor quality, as in some applications plastic gears will
actually last longer than metal gears. Hopefully, either
transmission would last a good long time. The failure modes
on the helical transmissions seem to primarily involve the oil
leaking out rather than gear failure -- although lack of oil might
obviously lead to gear failure.
OIL: There are reports online that people opening up
their 30-year-old transmissions are finding the oil a thick, goopy
mess. If you have such a transmission and you intend to keep
using it for a while, you might want to drain that old oil out and
replace it with a modern gear oil, or at least fresh Maytag gear
oil. Unfortunately, there's no obvious way to drain and
refill this transmission; it looks like you'd have to get it out
of the washer and then split it in half. Ugh.
There is an easy way to drain and refill an orbital
transmission: Remove the front panel from the washer, lay
the washer on its back, and roll the drum around until the cover
on the transmission is facing straight up. Remove the 4 (or
8) screws and remove the cover. Then, while holding a can or
something under it, roll the drum to one side and pour the oil
out. Roll it back to facing up, pour in some fresh oil;
with the cover off, the orbital case should be within a half inch
or so of full. Apply some sealant and reinstall the
cover. If you have an orbital transmission that's getting up
in years, this might be a good way to maximize its longevity.
SEAL REPLACEMENT: Occasionally one of these
transmissions gets incontinent and dumps all its oil out the
bottom. The pulley and belts then sling it all over
everything under there, the belts start slipping, it's a real
mess. Time to buy a new washer and dryer set? Well, if
you're that kinda person, perhaps. But if it's an orbital
transmission, it almost certainly can be fixed pretty
easily. There's a YouTube video showing how to remove a
rubber cap and a small screw, pop off a drive key, then spin the
big pulley off the bottom. You'll be looking at the lip seal
which is pressed into the bottom of the transmission.
There's supposedly a $90 tool for removing the seal, but the video
shows how to grind the tip of an old butter knife into a suitable
tool for prying it out. The replacement seal kit, AP4024008,
includes a plastic tool for installing the new seal.

Tap it in, remove the tool, and put the pulley and drive key back
on leaving about 1/2" of free play between the pulley and the
drive key. Then you'll want to top up the oil using the
method described above. You'll probably also want to replace
the drive belts; you'll never get all that oil off of them.
If you have a helical transmission, you're not so lucky. The
lip seal that can be replaced was only introduced in June of
1986. If your transmission was built later than that, you
can replace the lip seal using that seal kit -- but you'll still
be faced with figuring out how to top up the oil level inside the
transmission. If your transmission was built earlier than
that, this seal kit will not work for you -- there's no
place in the transmission to install it! Where the later
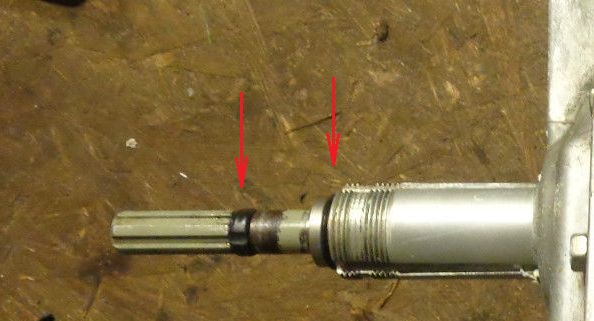
transmissions have a black rubber lip seal, the earlier helical
transmissions have a bronze bushing, as shown in this photo:
The seal on these older transmissions is part number 2-10286, and
it's up inside the case, not down on the bottom where you can get
at it. What's more 2-10286 is a fancy part number for an
O-ring. Any engineer worth his salt knows an O-ring should
never be used as a running seal, they should only be used to seal
stationary plugs and connections, but the guys designing this
gearbox didn't get that memo until June 1986. As a result,
sad to say, if your gearbox is leaking oil out the bottom, chances
are only too good that it's the earlier type with the sorry O-ring
seal. Since the transmission would have to come out and
apart to replace that O-ring, you need to consider whether to
tackle that job, or just install a new orbital style transmission
instead (with the later design lip seal), or just buy a new washer
and dryer set.
AGITATOR SHAFT TREATMENT: If you're rebuilding or
otherwise reusing one of these transmissions, you might want to
address corrosion issues on the agitator shaft. This shaft
is immersed in the laundry water with every load. Over a
coupla decades, it's probable it'd end up looking pretty
bad. The new orbital transmission in the photo above has an
agitator shaft that is jet black, presumably due to a coating that
hopefully will help protect it. The old helical transmission
in the photo above looks like bare steel; if it was ever coated,
the coating has worn away. If you tear it apart and
sandblast all the parts, you'll take the old coating off.
So what can you do to protect your agitator shaft? One
rebuilder online mixed up JB Weld 2-part epoxy, thinned it with
water, and painted the shaft with it. Good plan, I suppose,
but what I would use would be POR-15.
In 20 years, that coating would still look like new!
You don't need to take the tranny apart to coat the agitator
shaft. The coating only needs to extend through the seal on
the drum support, which is some distance above the transmission
housing. You can just mask the housing and coat the portion
protruding, and the seal will run on the coating and everything in
the water will be fully coated.
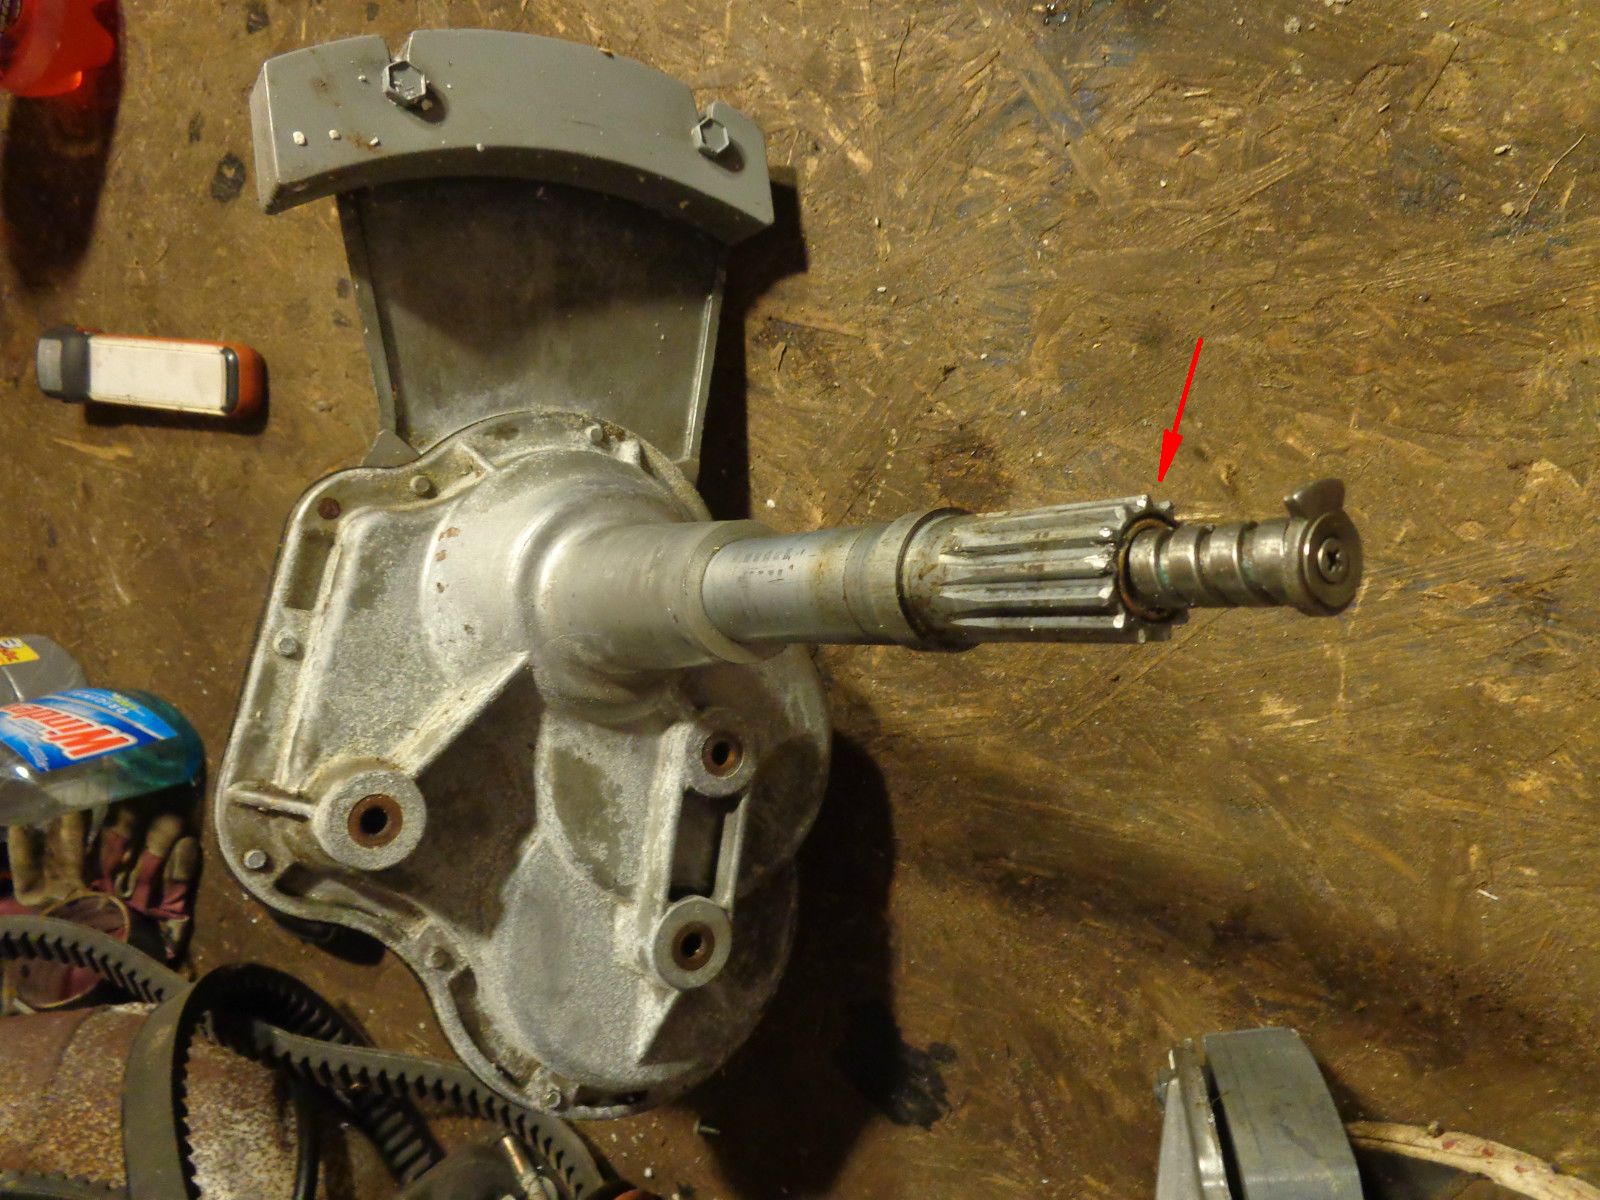
EXTRANEOUS O-RINGS: One online site shows an O-ring
being installed in the groove at the very top of the transmission
where the agitator shaft emerges, and another shows an O-ring
being installed on the agitator shaft itself just below the
agitator splines. Both are shown in this photo, although the
rubber thing under the splines looks like a rubber collar rather
than an O-ring:
I have no idea what either rubber ring is intended to accomplish;
they're not sealing anything. I assembled my washing machine
without either one.
LUBRICATION DURING ASSEMBLY: In watching numerous
YouTube videos and replacing a transmission myself, I was struck
by the lack of indications of using any lubricants when
putting a washing machine together. If you're tackling this
job, I recommend the following:
If you remove and replace the brake assembly
for any reason, anti-seize compound should be applied to the
threads prior to installation. Anti-seize compound should
also be applied to the threads of that little screw that holds the
locking device that digs into the threads on the brake.
On a couple of places online, it is recommended that about one
tablespoon of oil be poured into a new brake assembly to prevent
it from squealing when stopping. I concur that a tablespoon
of something should be poured into it, but I would recommend
automatic transmission fluid (ATF) rather than oil. ATF is
formulated for brakes, bands, and clutches, whereas oil will just
reduce the brake's effectiveness. There are two types of
ATF, Type F and Dexron; either one should work. Whatever you
pour in is not likely to ever come out; the brake package is
shaped in such a way that fluids won't pour out even if you tip
it.
Before dropping your transmission into place in the tub support in
the washer, I recommend applying Extreme Pressure (EP)
Molybdenum/graphite grease to the splines, both on the
transmission and inside the brake assembly. Don't goop it on
too thick; you don't want it flying off and getting inside the
brake. Use a toothbrush to apply just a thin coating, and
wipe off any excess.
There are "damper pads" under the tub support that it rocks around
on. If you have to lubricate them for any reason, the EP
grease would probably be a good choice.
Before setting the tub down onto the main tub bearing on top of
the transmission, I recommend the outside of the metal sleeve
that's slid onto the transmission and the inside of the bushing in
the bottom of the tub be lubricated with wheel bearing grease.
Before installing the rubber boot over the spigot in the bottom of
the tub, I recommend lubing up the bottom end of the rubber boot
with plumber's grease. NOTE: Take care not to get any
on the other end of that rubber boot, the end with the mating face
for the running seal. I did find mention of using
dishwashing liquid here instead of plumber's grease, but the
person making that suggestion also mentioned having a dickens of a
time installing that boot. One other installer suggested
using spit, but I doubt if that will help installation much
either. Using plumber's grease, I had no trouble at all
installing it.
Before installing the drum support, which screws onto the top of
the transmission, the portion of the agitator shaft that contacts
the rubber seal in the center of the drum support should be lubed
with plumber's grease, along with the inside of the seal
itself. Again, make very sure nothing gets on the running
seal face which is the larger diameter ring on the underside of
the drum support. That running seal needs to be assembled
dry, and in fact the face on top of the boot and the face on the
bottom of the drum support should be wiped with a dry cloth just
prior to installing the drum support to make sure they are both
clean and dry.
Also before installing the drum support, the threads should be
lubricated with anti-seize compound. Again, only a light
coat; you don't want globs of it in there.
After the drum support is on, wipe away any excess plumber's
grease before dropping the drum in place. Anything left in
here ends up in the laundry; plumber's grease is pretty innocuous
(safe for drinking water), but you still don't want it in your
laundry.
You should apply anti-seize compound to the threads on the
setscrew in the drum support; remove the setscrew entirely, apply
anti-seize compound with a toothbrush, and screw it back in.
I recommend applying anti-seize compound to the threads on top
of the drum support prior to installing the drum nut.
After installing the drum nut, wipe away any
excess anti-seize compound lest it end up in your first load
of laundry. That stuff will stain clothes big time.
On the older machines with metal tubs, the metal tub cover is
installed with a big rubber seal with a triangular
cross-section and a two-piece band clamp; the clamp has two
tightening screws 180 degrees apart. The seal should be
installed dry against the tub cover, but it'd be a good idea
to apply some plumber's grease to the inside surface of the
clamp itself. This will allow the clamp to slide easily
around the seal and tighten uniformly.
If either the tub or the tub cover are too rusty to seal
properly, it is recommended that the rusty area be sanded
smooth and recoated with POR-15.
I also recommend the threads on the clamp screws be lubed with
anti-seize compound. This clamp needs to be very tight
to ensure this joint doesn't leak when the tub is full of
water. The screws should be located in corners of the
cabinet; if on the front and back or sides, they may bang
against the cabinet when loads are out of balance.
I didn't find any instructions or videos on how to reinstall
that tub cover, so I'll provide a couple of tips.
Assemble the tub cover, gasket, and clamp loosely so that you
are able to pull the tub cover up or push it down. Note
that the "fin" needs to be to the rear; that's what contacts
the out-of-balance shutoff switch. Close the top of the
cabinet and install the two screws that hold it down.
Looking into the top of the machine, rock the tub around until
the center of the tub cover aligns with the center of the
cabinet opening. Peering through the open front of the
machine, observe the clearance between tub cover and cabinet
top. It should around 1/4" to 3/8", and it should be the
same all around. Pry areas up or press down as
required. Once properly positioned, tighten down the
band clamp. Rock the tub around to make sure it doesn't
hit the cabinet.
Anti-seize compound, ATF, EP grease, and wheel bearing grease can
be found at any auto parts store. Plumber's grease can be
found anyplace that sells plumbing supplies, including Lowe's or
Home Depot.