TECUMSEH GOVERNOR FAILURE
When this happened to my mower, I went online to see if others had
reported similar issues. All I found was guidance on how to
adjust a working governor, plus one small engines expert that
would offer advice for a fee. So, I'm posting my experience
in hopes of helping others.
SYMPTOMS:
I was just mowing along as usual, and all of a sudden the
engine started to "run away". It roared as though I had
given it full throttle, and revved way up. I cut the
throttle immediately, and was relieved the ignition
cutoff still worked. Upon further fiddling I found that the
engine would run at idle but the instant I moved the throttle just
a hair above idle the engine ran away and I'd have to cut the
throttle back again.
DIAGNOSIS:
I expected to find that a link had come loose or a spring had
broken or some such, but did not find anything out of sorts with
the linkage. The burning question: Did I miss
something, or is the problem really inside the engine?
Obviously, you want to make very sure the problem is inside the
engine before you go to the effort of opening it up.
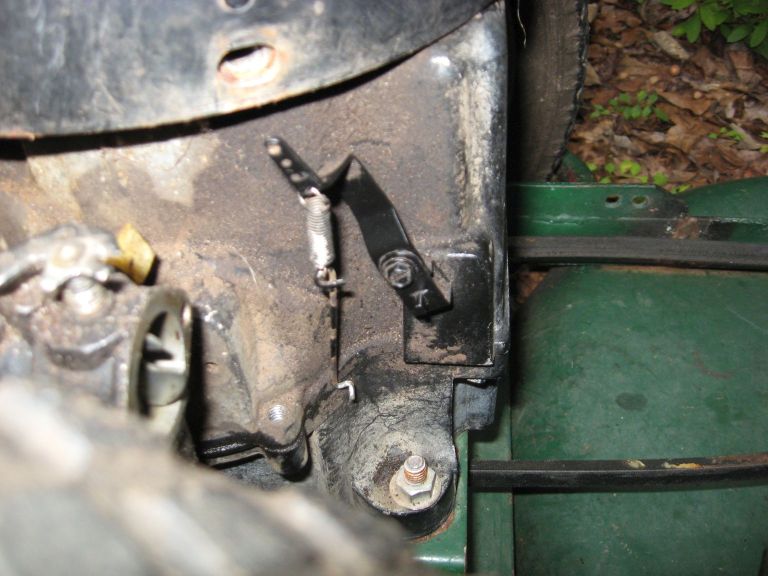
Clarity arrived when I disconnected the linkage from the governor
lever and the lever flopped over in the CCW direction as shown in
this photo:
That's too far CCW; it shouldn't be able to move that far.
That confirmed that the governor inside the crankcase had failed
somehow and I'd need to open up the engine to fix it.
What's more, if I cranked the engine over slowly, the lever would
bump up a little bit a couple of times per turn. That told
me that the governor spool was AWOL and the lever was bouncing
over the flyweights on the governor gear.
TO DO NOW:
If you're even thinking about disassembling this
engine, here's something you need to do right now.
There are several bolts holding the oil pan or crankcase cover to
the crankcase; on my engine there are eight 1/4" bolts with 3/8"
hex heads. On my vertical shaft engine, the heads are facing
downward, the threaded ends point up. Some of them thread
upwards into bosses on the outside flange of the crankcase so you
can see the threaded holes on the top side of the flange. Right
now, go out there and spray some Liquid Wrench into those
holes so it can begin soaking down into the threads.
Get up from your 'puter desk and go do it!
Steel bolts threaded into aluminum castings are a recipe for
seized bolts, and breaking bolts during disassembly makes this job
a whole lot more difficult than it should be.
The Clymer manual on Tecumseh engines says to reinstall these
bolts with Loctite 242 (blue), and so did a slip of paper that
came with the replacement oil pan gasket. I won't be doing
that. Rather, I'll be reinstalling those bolts with
anti-seize compound -- just in case I ever have to get in there
again.
TEARDOWN:
The Clymer manual basically tells you how to tear down and
rebuild the entire engine, including the governor. You'll be
relieved to know you don't have to do all that other stuff if your
only problem is a broken governor. The procedure is as
follows:
- Drain the oil.
- Drain the gas, or pinch off the line and remove the tank.
- Remove the pulley or whatever is affixed to the shaft of
the engine. The key must be removed, too.
- You'll probably need to remove the engine from whatever
it's mounted on.
- Remove the crankcase cover (horizontal shaft engines) or
oil pan (vertical shaft engines). It was eight bolts on
my engine.
- Fix whatever's wrong with the governor and reassemble.
You will obviously need a new gasket for the crankcase
cover/oil pan. You also might want to consider replacing the
oil seal while it's so convenient to do so.
FINDINGS:
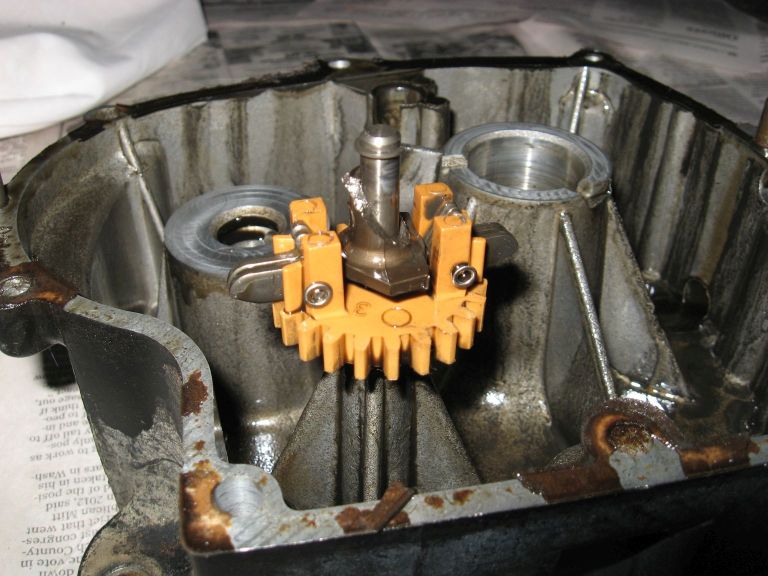
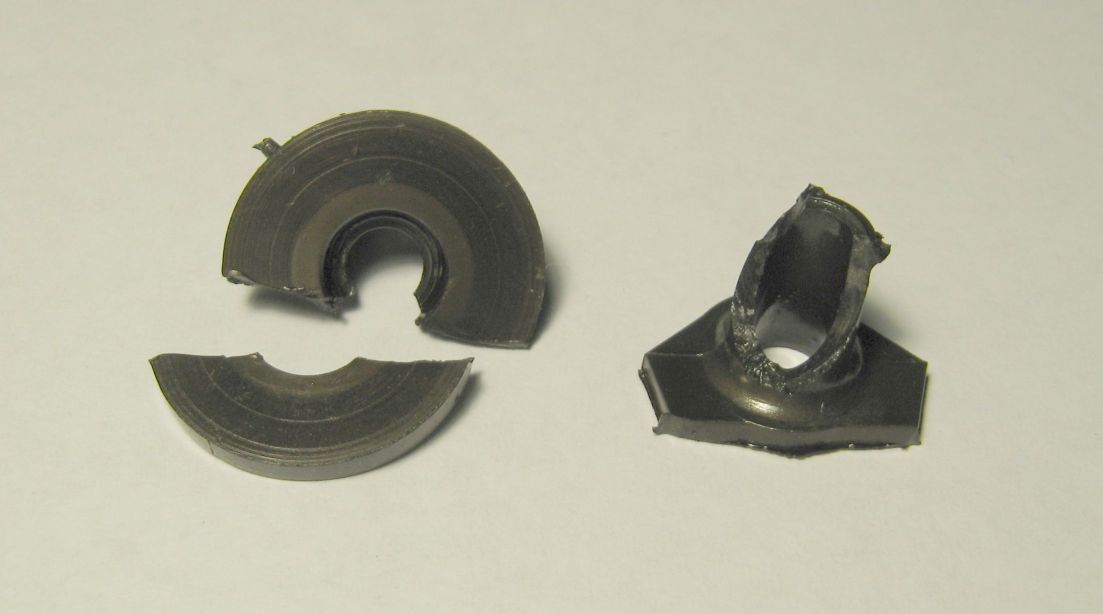
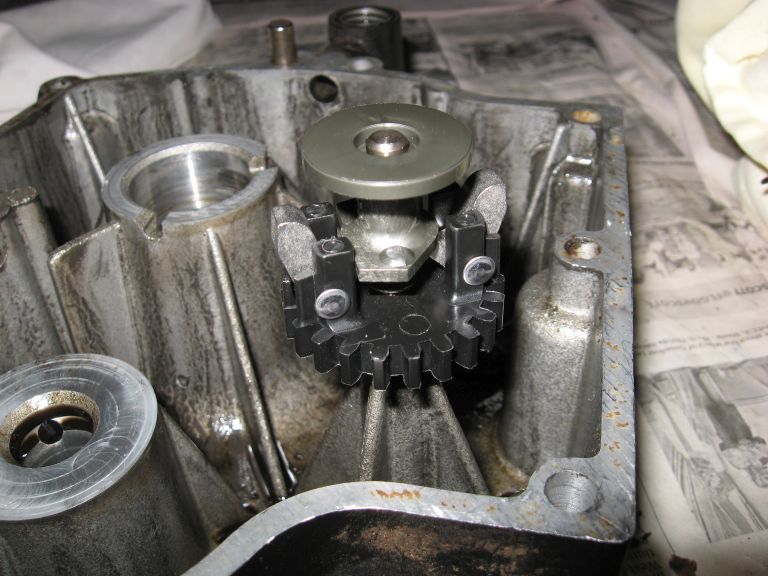
Upon removing the oil pan I found the spool broken as shown in
the photo at the top of this page. The spool had neatly
broken into three pieces; one remained on the governor shaft while
the other two were just sitting in the sludge inside the
crankcase. Since they hadn't been shattered or chopped into
a zillion pieces, it was easy enough to just pick the two pieces
out of the crankcase; no extensive cleanup needed.
Before the teardown, I pondered whether or not the failure might
be a wear issue; that the lever riding on the flat upper surface
of the spool had just completely worn through it. As you can
see in the photo below, wear on the surface of the spool was
negligible. This part broke just because it's a plastic part
that had too many years on it.
In general, plastic parts fail for one of three reasons:
- The plastic is exposed to sunlight; plastics don't like
UV radiation. Not a problem inside this crankcase.
- The plastic is exposed to excessive heat, causing it to
get brittle. That might be a factor here.
- The plastic is exposed to incompatible chemicals,
typically hydrocarbons or oil additives. That may be a
factor here as well, although I've always used the recommended
oil in this engine.
The current part number for a replacement spool is
30588A. They don't add the A for nothing; it indicates a
change of some sort, but not enough of a change to warrant an
entirely new part number. I'm hoping that the change is to a
different type of plastic.
In my experience with the Jaguar V12 engine, I've seen the arch in
its timing chain tensioner fail for little or no good
reason. I believe it's the same material as this spool, and
for the same reason: These parts have metal sliding across
them, and the plastic is a special formulation that is supposed to
minimize wear in such situations. Both the Tecumseh and the
Jaguar V12 are from the same era, so it was probably the state of
the art at the time.
THE GOVERNOR GEAR AND SHAFT:
I replaced the governor gear while I was in there even though
the old one was in good working order. Why? Because
it's plastic and it was 28 years old. It only costs about
ten bucks, and I'd just as soon not have to do this again.
The spool and the gear spin around a shaft that is pressed into
the oil pan. On mine, you pry off one clip and the spool
comes off, then you pry off another clip and the gear comes
off. According to the Clymer manual, though, some governor
shafts don't have the second clip. Rather, they have a
"boss" around the shaft that retains the gear. As a result,
the only way to get the gear off is to remove the shaft which is a
press fit into the oil pan. If this were the case in my
engine, I dunno if I'd replace that gear or not. Pulling the
shaft and pressing it back in to a specified depth is not a
trivial matter for a home mechanic, and entails more risk of
damaging the oil pan in the process. If I decided to go for
it, I'd have a spare shaft on hand.
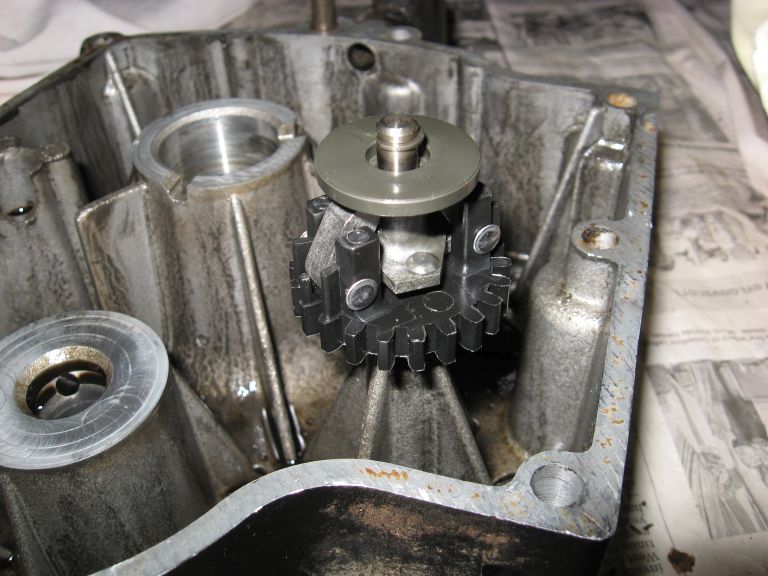
REPAIRS:
The replacement governor gear was black. Here's the
governor reassembled with new gear and new spool:
Actually, there are at least three differences between the old
gear and the new:
- Black vs. white (I suspect the old one only looked yellow
due to age)
- The flyweights are castings rather than stamped plates.
- The gear teeth directly outboard of the flyweights have
little posts sticking up that prevent the flyweights from
swinging farther out; they can't lay out flat like the ones on
the old gear in the picture at the top of this page.
These little posts should only make a difference during
assembly, I think; they hold the flyweights in the correct
position for installation of the spool. Once assembled,
the spool limits the motion of the flyweights.
Just for grins, I also took a picture with the governor in the
high-speed position, flyweights out and spool raised:
The governor lever rides against the flat surface on top of the
spool; as the spool rises, the lever moves to close the butterfly
on the carburetor.
After the engine was reassembled, the governor lever would no
longer move as far CCW:
That's as far CCW as it'll go. Compare this with how far it
would move CCW with a broken spool in the picture at the top of
this page, and you'll see why it became obvious that the governor
had failed and the engine had to be opened up.
As an aside: Upon reconnecting the linkage to this lever, I
realized that the linkage was not adjusted correctly. In the
Clymer manual it clearly stipulates that the linkage should be
adjusted so that when the governor lever is fully CCW -- the lever
inside the engine is in contact with the stationary governor --
the butterfly should be at wide open position. In this case,
when the butterfly was wide open the lever was perhaps 3/8" from
its fully CCW position -- and that's probably half its total
travel, meaning the lower half of the governor's control range was
inoperative. The governor had to move from its stationary
position to about halfway raised toward its fully extended
position before it'd even make contact with the governor
lever. I'm quite sure this linkage has never been fooled
with; I believe it was out of adjustment when it was originally
purchased. One could hypothesize that there was some
difference in the dimensions between the new vs. old governor
parts, but I don't think so.
It's easy to adjust: Just loosen the screw on the governor
lever (visible in the photo above behind the bottom end of the
spring) and then hold the butterfly wide open and the lower
portion of that lever (from the screw downward) CCW as you
retighten the screw. After adjusting the linkage properly,
the governor operation seems considerably better than it has ever
been. Specifically, it seems that I can adjust the running
speed higher than I could before without starting to close the
choke.
The following are presented as reference material related
to the governor repair described above:
GOVERNOR OPERATION:
Understanding how this governor works is helpful, but most of
the descriptions -- either in the Clymer manual or online -- are
clear as mud. So I'm going to provide my own description
here in hopes it'll make it more understandable for some.
I will be talking about four components:
- Governor (inside crankcase)
- Governor lever (part inside, part outside crankcase)
- Butterfly (in the carburetor)
- Throttle lever
The Tecumseh governor consists of a plastic gear with
flyweights (part number 30591) and a spool (part number
30588A). The gear is driven by the camshaft gear. As
the gear spins faster, the flyweights swing outward and push the
spool upward. Obviously on a horizontal-shaft engine the
spool is pushed sideways, but just cut me some slack here and play
along.
The governor lever consists of a metal rod that passes through the
crankcase wall with a stamped metal lever attached to it on the
outside. The portion of the rod inside the crankcase is bent
and shaped to ride on the surface of the governor spool.
The butterfly is the item on the carburetor that actually controls
how much air and fuel is allowed into the engine, and hence how
much power the engine develops.
The throttle lever is the device the control cable connects
to. It's the thing the operator moves to control engine
speed. On my engine it also engages the choke when moved
past the full-throttle point, but on other engines the choke may
be separate. There's also an electrical contact that shuts
off the ignition when the throttle lever is moved to the OFF
position.
The first thing to know: The governor lever and the
butterfly are firmly connected to one another by a link.
There are no springs or any other ifs, buts, or maybes in this
connection. One cannot move without the other
moving, period.
Governed speed control is a matter of balance between two opposing
forces. The throttle lever pulls on a spring that is trying
to speed the engine up; the farther the throttle lever is moved by
the operator, the harder the spring is trying to pull the governor
lever (and hence the butterfly) to the wide-open position to speed
the engine up. Meanwhile, the governor is trying to slow the
engine down. The faster the governor is rotating, the harder
it's trying to push the governor lever (and hence the butterfly)
toward the idle position to slow the engine down.
Hence, when the governor breaks -- the spool fractures and drops
into the crankcase -- the spring connected to the throttle lever
is free to speed the engine up unabated. Runaway engine.
There is a spring on the butterfly itself that's moving it towards
idle, but this spring is very weak and is not a significant player
during speed-governed operation. However, when the operator
moves the throttle lever all the way to idle, the spring that
pulls on the governor to speed the engine up goes totally
slack. The engine is turning slowly enough that the governor
isn't doing anything, but the light spring on the butterfly will
actually move the butterfly to idle and lift the governor lever
completely off the spool on the governor. Hence, idle is not
governed, but rather is set using an idle stop screw on the
carburetor.
THIS PARTICULAR ENGINE:
My engine is a vertical-shaft 8HP cast iron sleeve model TVM195
purchased new in 1987. It was installed on an
already-clapped-out Sarlo 21" walk-behind lawn mower chassis that
a local mower shop sold to me for scrap value. The
self-propelling mechanism was discarded; this is a mower you've
gotta push. No safety interlocks, no grass catcher.
8HP on a 21" mower may sound like overkill, but the purpose here
wasn't just to cut grass. My property is 73 acres of woods,
and I assembled this mower for the express purpose of cutting
walking trails through those woods. It's expected to cut
pretty much anything and everything I can roll it over, including
shrubbery, tree roots, small woodland creatures, you name
it. I have used it to cut paths through chest-high
weeds. The 8HP Tecumseh was chosen expressly because it's
the largest engine I could find that would fit between the tall
wheels on the Sarlo. The exhaust blows out through the
spokes on the right side wheel because there's no room to route
the exhaust any other way.
It actually has rather low hours on it; I probably don't run
it more than 20 hours a year, and even less lately because my
woods have thinned out and the trails don't require as much
upkeep. When it's run, though, it's run pretty hard, and the
governor probably gets a pretty good workout between patches of
nothing and patches of heavy ground cover.
Overall, it's been a good engine. I've had to replace the
starter cord and handle a couple of times. Before this
governor issue, the only serious problem I've had was a carburetor
float that started leaking and sank. When I replaced the
float I also rebuilt the carb, and it turned out one of the parts
in the carb rebuild kit was defective, so that task turned into a
fiasco until I finally figured out what the problem was.
Once sorted, though, it resumed starting easily and running
strong.
I'm probably not as scrupulous about changing the oil as I should
be. I never change it more than once a year due to the low
hours -- no need to change the oil when I'm not using the mower --
and sometimes it probably goes a couple of years between oil
changes. The oil always comes out still looking oily,
though; I've never waited so long that it came out looking watery
or gooey.
REPLACEMENT PARTS:
I mention the part numbers of the governor gear (30591) and
spool (30588A) in this page. These are the parts that fit my
TVM195. However, it's my impression that these same governor
parts fit all Tecumseh engines. Smaller engines
presumably have smaller camshaft gears, which means the engine
would have to turn faster to turn the governor at the same
speed. Hence, the same governor would efficiently control a
smaller engine at a higher RPM, which is usually what you're
looking for anyway. Pretty smart design on Tecumseh's part,
I think.
Replacing the governor requires a new oil pan gasket. In the
case of the TVM195, this gasket is part number 37342 -- which
superceded 35262 or 35262A, which superceded 33253, otherwise
known as G310 or 470-443. Clear? Actually, I suspect
there are minor differences there; for example, the 37342 I
received has odd little red rubber beads printed on one side,
while I suspect the earlier gaskets were plain paper.
Whatever, my decision was to apply Hylomar to both sides, as
Hylomar should make it easier to come back apart later. I'm
not a big fan of having to carefully scrape old gaskets off
machined aluminum mating faces, and it shouldn't ever be necessary
if the correct gasket dressings are used during assembly.