CREATING A LETTERBOX
by Kirbert
Updated 4/14/2011
Where you begin when creating a letterbox is a matter of
preference. You might be inspired by stumbling upon a really
juicy location, and then design a rubber stamp and prepare a container
that are fitting for that location. Or, you might decide on a
theme for a letterbox, or a series of letterboxes, design the rubber
stamps accordingly, and only after they are in hand do you set
out to find places to hide them.
Whatever gets you started, one of the first steps will be to make a
rubber stamp. I provide Rubber_Stamp_Carving_Tips
on a separate page.
CONTAINER
The next job is to find a suitable letterbox container.
Ideally, the container will provide both protection from physical
damage and a watertight seal against the elements. The watertight
seal is harder to come by than you might think, however, so in some
cases one must rely on baggies to keep the log book dry and accept that
the container will only serve to protect the baggies from damage.
With letterbox containers, smaller is only better in a small
percentage of hiding spots. For most hides, a larger container
will
hide just as well as a tiny one. With the larger container,
people
don't have to cram to get the stamp and log book back in -- which bodes
well for the durability of your baggies. Also, it's nice to
choose
a container with some extra room for hitchhikers.
The ammo
box
so popular with geocachers is typically much larger than you need for a
letterbox, although it will work if you have the space to hide
it. The ammo box is the gold standard of physical protection and
reliable sealing against
water intrusion, and they can be purchased for reasonable prices from
your friendly army surplus store.
There is another container available from an army surplus store that's
more appropriate for a letterbox. It's commonly called a "decon
container" and
it's a small plastic container with a snap-on
lid, in camo green of course. It works very well.
The
"entree" size plastic food storage container is a typical size for
a letterbox, but nearly all of them seal surprisingly poorly. The
thin
plastic Glad
and Ziploc containers leak, and they're not all
that great for physical protection either -- they tend to crack,
especially in cold weather. The
premium Rubbermaid
containers with the rubber seal around the edge of the cover are
physically tough and may seal
fairly well when new but the rubber lip
always seems to get contaminated with dirt and starts leaking.
The best food storage container is the Lock&Lock container
-- but be sure to select a rectangular one in which the latches run the
full length of all four sides. The round Lock&Lock containers
typically have four puny latches around the circumference and hence
don't latch as reliably.
The only downside of a Lock&Lock is that some people
manage to put the lid on upside down -- which will latch but it won't
seal. You can't believe anyone can be so
stupid until you find a letterbox with the top on upside down and the
contents soaked.
There are other brands of latch-top containers available, and many of
them work well. SnapWare looks pretty much like a
Lock&Lock except the
latching tangs are on the flaps rather than on the sides of the
base. As a result, the lid cannot be installed upside down, which
avoids the one issue with Lock&Lock -- but SnapWare containers have
been known to have the latch break completely off, which is not good.
Other ideas for containers include plastic
screw-top food containers such as those used for pretzels, nuts,
mayonnaise, coffee, or peanut butter. You'll want to remove the
original gasket under the cap; it's probably paper, which won't really
keep water out, and it probably smells like food. To
provide a
reliable seal, go to a building supply store such as Lowe's or Home
Depot and purchase some "shower pan liner". It comes on a big
roll, four or five feet wide, and they cut off however much you want
for you. It's usually about $1.20 per square foot. From
this shower pan liner material,
cut out suitable gaskets and insert them in the screw caps for your
jars.
Also, make sure the top edge of the jar itself is smooth; sometimes a
foil seal isn't removed cleanly and leaves a ragged edge. To
clean it up, lay some sandpaper on a flat surface, turn the jar over,
press it down on the sandpaper, and move it around until it cleans up
the edge of the jar. You may also want to burnish the inner and
outer corners of this edge so people don't cut themselves reaching into
the jar.
This author has been using screw-top jars with shower pan liner gaskets
for years, and the results have been outstanding. Contents
typically look as good as if they had been stored in a dresser drawer
all that time, no dampness or mildew at all. There are only two
downsides to the screw-top jars: 1) Some elderly people
with arthritis have some trouble getting them open and closing them
securely when done. And 2) sometimes the gasket falls out of the
cap and finders can't figure out what it is so they just jam it into
the container and screw the top back on without it. I've taken to
writing directions directly on the gasket itself to make sure it's in
position in the cap when closing.
You can make a very durable container out of PVC pipe.
You can select the size and length pipe you need. Glue a cap on
one end. Some just jam a cap on the other end, but that's not
recommended; it often ends up really difficult to get off. A
better idea is a test cap, which is a rubber cap that's secured with a
hose clamp and generally available nearby in the plumbing supply
section. For this job, you can omit the hose clamp and just push
the rubber cap in place. Another idea is to glue on a threaded
fitting and use a screw-on cap, although sometimes those are difficult
to get loose as well; some letterboxers have gone so far as to glue a
handle on the cap to make it easier to unscrew. There are also
rubber couplings intended for connecting two sections of smooth pipe
with two hose clamps; you can use such a coupling to connect two
sections of pipe, each with a hard cap glued onto the other end.
There are also fittings known as "unions" which involve a flat face
with an O-ring for sealing and a big nut to hold it together, and those
are usually easy enough to get apart by hand. The downsides of
all this: Although PVC pipe is pretty cheap, by the time you buy
all these caps and fittings and the PVC cement to assemble it, it's
probably going to be considerably more expensive than most other
containers.
A few other container ideas to mention:
Film canisters: popular for hitchhikers because they're small,
but they are not reliably
watertight -- and having to use baggies
inside is not likely to work because the space is so cramped. In
general, only use film canisters indoors, inside other containers, or
otherwise where they won't be exposed to the elements.
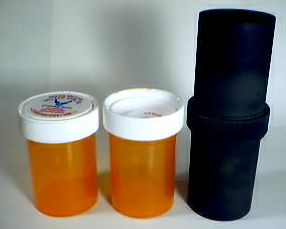
Prescription pill containers: These are not reliably watertight,
and they can also easily get cracked. If used outdoors, make very
sure the contents are securely protected by baggies.
Interestingly, the ones with a snap-on cap have proven somewhat better
at remaining watertight than ones with push-and-turn childproof caps.
Glass jars: The usual recommendation is to avoid containers made
of glass because
children finding the letterbox may accidentally break it and hurt
themselves. Perhaps this is sound advice, but there are
exceptions. This author placed the "P-51 Mustang" letterbox in
St. Petersburg, FL using a plastic screw-top container, and within a
couple of weeks received reports that the container was all torn
up. Evidently that location is a popular place for people to walk
their dogs, and the dogs would sniff out the container and chomp on
it. Amazingly, the box never went missing -- evidently the dogs'
owners would retrieve it from their dogs and rehide it. Visiting
letterboxers applied duct tape over the tooth holes to help keep water
out. The next time I was in the area I replaced the plastic
container with a glass screw-top container, and it remained far more
secure after that.
Here's an idea for a long, slender container to fit in that crevice
you've been wanting to hide a letterbox in: Take two
small containers and connect
them end-to-end with aluminum tape. With some containers, you can
tape
them together butt-to-butt so there's a cap on each end, and with
others you can tape the caps together so the jars unscrew from the
junction. Either way you end up with one long
two-compartment container. Put the log book in one end, the
rubber
stamp
in the
other.
I've found some prescription pill containers that have a cap
that goes on one way with a push-and-twist, but you can just flip the
cap
over and it simply screws on. With this type cap, you can make a
double-compartment container without taping; just screw one container
onto each side of the same cap.
Unfortunately, prescription pill containers are not reliably
watertight, so you'd need to hide them somewhere protected from rain.
Make sure it's easy to get things in and out of your container.
If the container is large, an opening large enough to fit your hand
into is a good idea. For smaller containers, an opening with
smooth sides so you can turn the container over and things fall out is
good; prescription medicine containers and 35mm film canisters fit this
description. What you do not
want is something with a small screw-on cap that's necked down from the
body of the jar, like most vitamin bottles, because it becomes a
battle to get anything to come out. When a finder must try to get
ahold of one bit of a baggie and tug to try to get stuff to come out,
the baggie will soon be torn and everything inside will get damaged
pretty quickly.
Some letterboxers skip the entire idea of a container at all and
simply put all the contents into a baggie and hide that. If it's
an indoor hide, this can actually work -- but it won't work long for an
outdoor hide. The squirrels will chew through the bag. You
need more physical protection than that.
I should also mention the "planter's pouch". The idea is to take
a freezer bag and cover the entire exterior with duct tape. The
usual design involves creating a flap made entirely of duct tape that
folds over the opening and tucks under a strap -- also made entirely of
duct tape. Surprisingly enough, these things work really
well! The duct tape protects the freezer bag from getting
damaged. The biggest downsides are that 1) finders often
fail to reclose them properly; and 2) big nasty bugs like to hide
under the flap and scare the bejeezus out of the finder when opening.
CAMOFLAGING
YOUR CONTAINER
With some containers -- and some hiding locations -- you may want to
paint the container. For hiding in the wilderness, ideally you
should apply a camo paint job
-- which is not a single color but rather a hodgepodge of two or three
colors to break up the silhouette of the object. Flat black can
be one of the colors, but for the others you'll need genuine camo paint
-- regular flat green or flat brown doesn't work nearly as well, trust
me on this. The
Krylon and RustOleum camo paints
come in three different colors, an olive drab, a brown, and a
gray. For most woods hides, you can get away with just the
dull olive green camo and a generic flat black. Apply a first
coat of one, and a second coat
with another, making sure the finished product is blotchy.
For the flat black, Painter's Touch by RustOleum is highly recommended.
It's a bit cheaper than the camo colors, but it's also better quality
paint and has better coverage. Rather than drying in a couple of
minutes, Painter's Touch takes a full half hour to dry. It sticks
remarkably well to most plastics, but not to the lids of screw-top
plastic jars -- I always apply black or brown duct tape to the lid and
then paint over it.
You can also consider automotive trim paint, which is available at auto
parts stores, commonly in "satin black" for painting rubber and plastic
bumpers and trim. It's much more expensive than regular flat
black paint, but it's also more durable. It works great on
bumpers, too.
The paint job will get scratched and dinged
up in the wild. It may not be pretty any more, but it'll still be
difficult to see under a bush.
If you prefer not to paint, you need to either find containers made of
the right color
plastic to begin with, hide them where color won't matter, hide them
inside a camo bag, or cover them with camo tape.
Camo tape is available in sporting goods stores (including the sporting
goods department at Wal-Mart) as well as army surplus stores.
Camo tape is kinda expensive (twice the cost of regular duct tape, for
some reason) and it doesn't last more than a couple
of years exposed to the elements, but it provides effective camo while
it lasts. Also note that there is some really terrible camo tape
out there with colors that really don't blend well, the greens are too
bright. Finally, note that there are two general types of camo
tape, camo duct tape and some tape that's intended for wrapping gun
stocks. The latter stuff is designed to peel off easily while not
leaving any residue, and it reportedly falls off a letterbox container
too easily.
A camo bag works well. The trick is to find some material that is
both camo (that blotchy pattern of olive green and brown again) and
durable enough to hold up without rotting or falling apart. Then
sew it into a bag to hold your container.
You might note, in this age of terrorism, that there may be an
issue with painting plastic containers. With deliberately hidden
containers, especially ammo boxes and capped sections of pipe,
sometimes a muggle will find
one, conclude it's a bomb, and call in the authorities
and get everybody all excited. As a result, some area authorities
have
requested -- or even required by law -- that letterboxes
and geocaches be hidden in clear plastic containers so that the
contents can be verified without touching them. In some cases,
you can effectively camoflage a clear plastic container by just
painting blotches on it, leaving clear areas for seeing the
contents. I dunno if this would meet the letter of the law.
If you leave the container transparent, it becomes important that the
contents are camo colors, too; you don't want a bright red log book in
there.
Some people go to much greater lengths to camoflage their
containers. Taped-on plastic ferns and leaves, dangling shards of
camo-colored fabric, you name it.
It's usually a good idea to write "LETTERBOX" on the outside of the
container; it helps accidental finders realize it's not litter.
One method that works for me is to paint one area with the camo paint
and then write on that area with black permanent magic marker.
That maintains the camo while still providing a clear, readable
label. I also sometimes use a silver or white colored pencil,
which shines
a bit but doesn't really harm the camo.
Another popular idea with transparent plastic containers is to mask off
a rectangular area while painting, and then write backwards on the
inside so it can be read through the clear plastic.
It is recommended that you write the name of your letterbox on the
outside, and also the web site where the box is listed (atlasquest.com,
letterboxing.org, etc.) This way, if the bomb squad finds it,
they can look it up online and confirm what it is.
LOG BOOK
You also need a log book.
You'll
be amazed how difficult this
is,
because you need one with no lines! A high percentage of the
books you can buy with unlined pages are either waaaay too big for a
letterbox (artist's sketch pads, etc.) or are cute little things with
inferior binding so the pages are falling out by the time you get
through the checkout line. You also either need pages
that are heavy enough that ink won't bleed through to the other side,
or enough pages that there's no need to use the back sides of
pages.
My solution is to make
logbooks. The easy way: buy a package of 100 unlined 3x5
cards. Holepunch one corner, run a piece of string through and
tie it, you're done. I've found, though, that 3x5 is bigger
than
I like, so instead I buy 8-1/2 x 11 "cover stock" at Staples (which is
slightly lighter than card stock) and cut each sheet into eight 4-1/4 x
2-3/4 pages. Or, 4x6 unlined cards and slice each one into two 3
x 4 pieces. Or, 5x8
unlined cards cut into four 2-1/2 x 4 pieces each. It helps to
have a big heavy-duty paper slicer to do
this job, but the little plastic sliding slicer type intended for home
use will also work if you do only one card at a time. If your
paper slicer doesn't have some sort of
adjustable paper stop, you might try taping a ruler down on it so you
can slide the paper right up against it and make every cut exactly the
same size. You can also opt to cut the paper into a special size
and shape needed to fit inside some particular container you intend to
use -- or into the baggies you plan to use.
Find some flat sheet plastic from some packaging that
would otherwise get thrown away to make "covers" for this little log
book. I make the covers
just a hair larger than the paper on all sides. Don't try to cut
such plastic with the cheap sliding-cutter type paper slicer; instead,
lay a ruler on it and run along the ruler with an X-Acto knife (which
you have on hand for making rubber stamps).
Trim the
sharp
corners with a
fingernail
clipper. Ideally the covers and/or the
pages
themselves should provide enough stiffness that a rubber stamp can be
successfully applied while holding it in your hand, no need to find
someplace flat to lay it on while stamping.
Another idea is to tie the book
together using a bolt
and
nut in one corner. Or you can use a keychain, if you have spares.
Alternate plan B: I sometimes use containers that are entirely
too small for such loose-leaf logbooks. Here's what I do there:
buy a package of cash register paper, which comes in
rolls
2-1/4" wide or 1-1/2" wide. One package will have hundreds of
feet of paper, all unlined. Cut off about 10-15 pieces about 11
inches long, stack them neatly, and staple them together at one
end. You can then roll this little "book" up really tight -- in
fact, the 1-1/2" version will fit inside a 35mm film canister!
The paper is thin, but you can get a lot of it in there. It's
curly and constantly tries to roll up on you, but it's pretty easy to
hold flat when stamping -- but the stamper will need to have a flat
surface to work on.
The reason to cut them to 11" long is that someday somebody might want
to lay the pages on a flatbed scanner and scan them. Most flatbed
scanners won't handle pages longer than 11".
BAGGIES
Usually you will want to put the log book inside a plastic baggie. Besides
the regular food storage
baggies you can buy at the grocery store, you can also buy a package of
100 smaller
"craft bags" for a couple bucks at crafts stores. It's also
usually a good idea
to put the rubber stamp, wrapped in cloth or paper towel, inside a
baggie as well, but always use a separate baggie.
I say "usually" because sometimes a baggie is counterproductive.
Some letterbox containers have a very reliable seal, such as a Thermos
bottle that I used once. And sometimes the baggie gets caught in
the lid when it's being screwed on, causing a leak that wouldn't have
happened if the baggie had been omitted. Assembling a letterbox
without baggies is called "going commando". The only problem with
that idea is that some helpful letterboxers decide the baggies are
missing and install them, causing leaks in the future.
Some letterboxers insist on two baggies on each item, and note that
often one baggie has failed while the other saved the log book. I
like to point out that, if you've got one baggie inside another,
usually
one or both of them will fail. This is because it's such a PITA
to be
fiddling with all those baggies. When you're all done, it can be
difficult to figure out if you've closed them properly. One sound
baggie is probably better than a lot of fiddling with multiple baggies.
Always make sure your baggie is plenty big enough for the stuff you're
putting in it. There's no surer formula for a torn baggie than
one that you must cram something into to get it to fit.
Note that baggies come in different "mil" ratings, the measurement of
the thickness of the plastic. The craft bags are perhaps the
thickest and most durable. Some heavy-duty freezer bags are also
very durable. At the other end of the scale, the "sandwich bags"
that come in a box of 200 are so thin you can scarcely tell they're
there, and they tear at the drop of a hat.
Whether or not you get the type of baggie with a little zipper on it is
a subject for debate. I have found the little zippers to be
unreliable -- they often zip right off the end of the baggie. I
also believe they don't seal as well at the corner where the zipper
rests. However, they are a great deal easier to use, especially
for older letterboxers with arthritic fingers. Having a baggie
that may or may not fully seal when the zipper is closed is better than
a baggie that the finder couldn't close at all.
You might also consider containers within containers in lieu of
baggies. For example, you could put your rubber stamp inside a
prescription pill container instead of a baggie and then put the pill
container inside your letterbox. This would actually be better,
since a prescription pill container will protect the rubber stamp from
physical damage as well as water damage (rubber stamps are actually not
particularly susceptible to water damage). Similarly, you could
roll up a log book made from cash register paper, put it inside a pill
container, and put that entire container inside your letterbox.
Pill containers are not reliably waterproof, but they may be as good as
a baggie; they're definitely better than a torn baggie.
INK PAD
It's optional whether or not you include an ink pad in the
letterbox. If your rubber stamp demands an unusual
color ink,
it's a good idea to include one. I offer a separate page on ink pads. A baggie may help your ink
pad last longer
without
drying
out. A baggie may also help prevent disaster.
If the stamp image just calls for black ink, or it doesn't matter what
color is used, it's a better idea not to include an ink pad.
Letterboxers will bring their own. You can tell them what color
to bring in the clue listing.
PEN
Unless you require an odd color ink or something, there's no need
to include a pen in the letterbox; letterboxers will bring their
own.
COLORING PENCILS AND MARKERS
You may want to provide colored pencils or markers for coloring the
stamp image after stamping. Judging from this author's experience
at earning Blue Diamonds on atlasquest.com, letterboxers really like
coloring stamp images! It is my opinion that stamping an image in
black and then coloring it with colored pencils or markers is much more
fun and results in a much better image than trying to use multiple
colors of ink on the stamp itself.
Colored pencils are great for coloring stamp images; they come in
zillions of colors and you can cut them short enough to fit in the box
even if the box is really tiny. Remember
you must include a sharpener in the letterbox -- and the blade in the
sharpener can rust, so provide a dedicated baggie for it.
You can also provide highlighters or other felt-tip markers for
coloring. You can often find them in really tiny versions, made
to be used as a key fob or something. This author isn't terribly
fond of markers; it's difficult to use them without getting a "blotchy"
appearance, they sometimes bleed through the paper, and the colors will
usually run when wet. And of course the markers often dry out in
the letterbox.
Never, never, never put pens
or pencils inside the baggie
with the log book!
They will punch holes in the baggie. Put them in the container
outside the baggie; moisture generally won't damage pens or pencils.
INTRODUCTORY MESSAGE
You will want to include a message to any non-letterboxers who
find the
box by accident. This printed message likewise needs to be
protected
from water. One way is to have it laminated, but make sure to cut
out
the paper first and then cut
out the lamination leaving at least 1/4" around all
sides of the paper. If the paper comes to the edge of the
lamination, moisture will seep in along the edge and ruin it.
Rather than laminating, I usually just use another baggie. Craft
bags cost
only about
two
cents each. I arranged that my printed note was exactly the right
size
to fit neatly inside one. If you can open and print a MicroSoft
Word document, you can just download my note
and use it. I also have the same
note in OpenOffice Text format. I usually print it on green paper, which somehow
makes it look more official and it also helps the camo if the container
is transparent.
Another idea is to just include the introduction note in the log
book. You can print it the right size and include it as the first
page.
CONTACT THE PLACER NOTE
Some people add a note asking finders to report on the condition
of the
letterbox. The traditional method is to place some stamped
self-addressed post cards in the letterbox that have already been
stamped with the rubber stamp in the letterbox. That way a finder
can just take one with him and write on it later and post it at his
convenience -- but it also gives complete strangers your home address
which some people would rather not do. Another way is to just
place tiny slips of paper in
the letterbox with your e-mail address, so they can just take one of
those with them. The simplest idea is to just to make the request
in the log book and hope the finders take the time to read it and
respond. Or you can forget about mentioning it in the letterbox
at all and just rely on a request at the letterboxing.org or
AtlasQuest.com sites to contact the placer.
I must say that all of these ideas have only limited success.
After hearing of only a few finds via e-mail or online logs, I often
visit one of my letterboxes to find several times as many stampings in
the log book as I expected to find. Apparently there are a lot of letterboxers out there who
see no point in logging their finds online or contacting the placer.
HIDING THE LETTERBOX
I have not yet written any guidelines for hiding letterboxes and
writing clues. I don't consider myself much good at it. If
"Red's Bunch" would create a set of guidelines, I'd just link to
them! Just as with the carving of the stamp, though, keep in mind
that it is an activity to be savored and enjoyed.
I do have one recommendation: Hide your box as securely as
possible. Whether or not the box is easy to find should be a
function of how clearly you write your clues, not how obvious the
hiding spot is. The hiding spot should not be obvious at all;
ideally, it should be a place nobody would ever look unless they had
clear written instructions to look there.
Here's an idea: When you're at the site, hide the box and jot
down a complete description to yourself about how to find it.
Maybe even take pictures, not only of the hiding place but of the
surroundings, the entrance to the park, nearby road signs or landmarks,
etc. When you get home, before posting the letterbox
on LbNA and AQ, mull it over for a couple of
days. You may come up with something clever, like a story or a
poem or a unique method of presenting the info needed to find the
box. A couple of days of the box waiting in the wild won't hurt.
In fact, it might help. A geocacher once told me that he was
remarkably successful at being the FTF on new boxes because he took his
dog along. His dog could smell where someone had been recently,
and would lead him right to where the box was hidden. You've
gotta wait a few days to prevent this sort of cheatin'.
FLOOD-PRONE AREAS
In the area where this author lives, a remarkably high percentage
of
letterboxes are hidden in flood-prone locations. A great many of
the parks in the area are parks simply because the area is flood-prone,
nobody wants to build any buildings on the land. And often the
prettiest or most interesting locations are near a river or lake or
coastline.
It's really irritating when you are sitting down to watch the news and
the first story is about how high the flood waters are and you realize
that your letterbox is probably far out to sea by now. It doesn't
matter if the container is watertight and the baggies are sound if the
box is gone. The first
priority in such hides is to make sure it stays put; worrying about
keeping the contents dry is secondary.
One method, of course, is to hide the box up high off the ground.
This is only good for about six feet, though, unless you expect your
finders to climb trees. There are areas here in N FL that
regularly flood 20 feet deep or more. Besides, often the
opportunities for hiding well off the ground are limited at best.
My method of choice is to tie the letterbox down with a length of
string. Not only will
this greatly improve its odds of still being there after a flood, it
also helps muggles note that it is not litter so they don't just throw
it away without first looking to see what it is.
Sometimes I will include a clasp that allows the finder to disconnect
the box from the string to carry it away for stamping in and then
refasten it when done, but that's not really essential; he can just
open the container and remove the contents to carry off.
If you have any comments or suggestions -- or additions --
please write
me at "palmk at nettally dot com" or visit http://www.letterboxing.org or
http://www.AtlasQuest.com and
look me up (Kirbert) and use the "contact
the placer" function to drop me a note.