GOUGE MODIFICATION - MINIATURIZATION
There are three popular modifications made to carving gouges:
Pinching, reversing, and miniaturization. On this page I will
discuss miniaturization.
A Staedtler 1V and 2V are both V-shaped carving tools, and they both
have exactly the same crisp corner at the bottom of the V. In
theory, anything you can carve with a 1V you could carve with a 2V;
with either gouge, you simply hold the gouge at a shallow angle so only
the tiniest part of the bottom of that V cuts into the rubber, and you
can carve out a sliver of rubber about the size of a human hair.
But nobody would even think of carving such fine details with a
2V because, even though it has the capability, it's a big
clunky thing and it's difficult to see what you're doing around that
massive tip. You pick up the 1V instead.
A "miniaturized" gouge is to a 1V what a 1V is to a 2V: it has
the
same basic shape, a V-shaped gouge with a nice crisply-formed corner at
the bottom of the V, it's just smaller. You could call it a "1/2
V". And, theoretically, there nothing you can do with a
miniaturized gouge that you couldn't do with a regular 1V -- or a 2V,
for
that matter -- but it certainly feels like you're working with a far
better tool for fine detail work.
MINIATURIZING A GOUGE:
Start with either a Staedtler 1V or a 2V. Since they both have
the same crisp corner at the bottom, either will work and will end up
with exactly the same configuration when done; in fact, you can make a
1V out of a 2V using this same process. The only difference in
the finished product is that the 2V will still say "2V" on the handle
and have a different color grip. If you have both a 1V and a 2V
laying around and plan to perform both a miniaturization and a
reversal, I recommend miniaturizing the 1V and reversing the 2V.
Note that, if you're working with Speedball products, you must be using a #1 for this
modification; the Speedball #2 is not
a V-shaped tool but rather a U-shaped tool with a rounded curve at the
bottom.
The first step is to make sure your gouge is straight and sharp by
following the process described on the sharpening page.
You can clean up and resharpen a miniaturized gouge, but it's easier to
see what you're doing with a full-size 1V so you might as well do it
before you miniaturize it. You can skip the "minor gouge
modification" at the bottom of that page for now, as you'll be doing
that as the last step in the miniaturization process anyway.
From now on, take care not to damage the finely-honed cutting
tip. If you do, obviously you'll have to go back later and fix it.
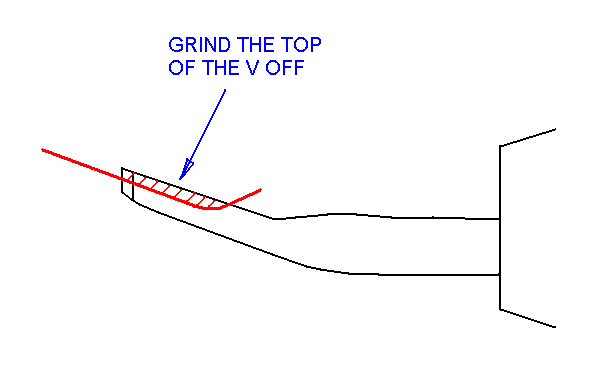
Next, hack the top off your nicely-sharpened 1V or 2V as shown:
You can use any tool or grinder that works for you. I use a
Dremel with a great big diamond-coated barrel in it, but I could pull
at least a dozen other bits for my Dremel out of my box that would do
the job. You can use a bench grinder. You could even use a
knife sharpening stone or the coarse side of a diamond hone.
Honestly, there's not much precision required here. You can make
this a straight, flat grind, or you can scoop it a little bit (as
shown) so the top of the tip is roughly parallel to the bottom and the
sides look straight rather than tapered. Doesn't really
matter. It's also up to you just how much you want to cut off,
meaning how much you want to miniaturize your gouge. You might as
well only make it a little bit smaller than a 1V to begin with; it's
easy enough to go back and make it smaller later on.
This grinding will make a visible difference right away, and that is
that the tops of the sides at the tip will be flat and shiny whereas
before they were dark in color and angled. Neither makes any
difference to function. The shiny top, however, makes a good
guideline for how much you're miniaturizing: The farther you go,
the narrower the slot between the sides gets. Obviously it's the
width at the tip that's important. I usually shoot for about half
the original width, but that's actually a pretty severe miniaturization
(customers want their money's worth!). If you're doing this job
for yourself, you might not want to miniaturize quite so much.
This grinding will leave four ragged corners: The outside corners
of both sides of the tip, and the inside corners. The next step
is to "deburr" those corners, meaning to lightly burnish them to get
rid of the sharp, raggedy edge and leave a neat, smooth edge. You
can use pretty much any stone or diamond bit that'll fit into the
slot. I use a cone-shaped diamond bit in my Dremel to make the
job quick, but I could use the same bit without the Dremel without much
more effort. You can just use your Arkansas stone or diamond hone
to do the outside corners, but you'll probably need something smaller
and more pointy to get the inside corners.
Honestly, you could do this job with a rock you picked up off the
street if it had a pointy corner on it.
The one thing that you need to be careful about here is not to damage
the cutting edge. You're working near it, and if you're not
careful it's only too easy to slip and ding that tip with a tool that
will most definitely mess it up. It helps to be moving toward the
tip at all times, going on past and zipping clear off the end without
stopping.
Finally, perform the "minor gouge modification" suggested on the
sharpening page for the regular 1V. It's the same thing only
smaller. For convenience, I'll copy over the entire step here:
Hold your
gouge with one side of the tip against a grinder or hone (either works
here) as shown:
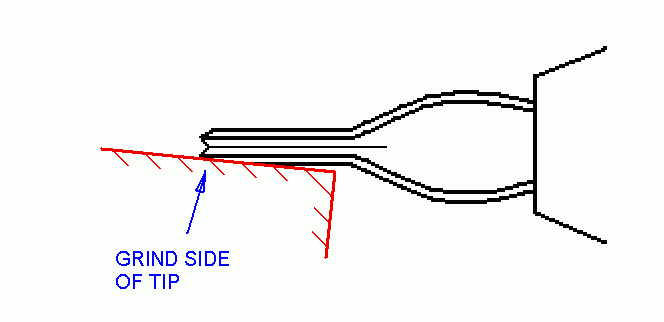
You'll need to use the corner of a grinder or hone for this task,
because you need to get down low enough that both the broad part of the
nib and the handle would be contacting the grinding surface.
Grind away the side of the tip as shown. When viewed from the
side, the resulting flat will be a triangle with a long straight side
along the top edge of the gouge tip and the peak pointing
downward. The forward end of this triangle should not meet the cutting edge!
Get it up close to the cutting edge and quit. Obviously, repeat
for the other side.
These cuts do not affect the cutting edge at all; the cutting edge is
not involved -- that's why it doesn't matter if you use the hone or
grinder. What this modification does is make the tip visibly
narrower, which means it's easier to see what you're carving because
there's less gouge in your line of sight. You'll be surprised at
how much it helps. And it's quick and easy to do.
The completed gouge should have 5 "facets" around the outside.
Two triangles, two trapezoids, and one elongated diamond.
You're done. Using a scrap piece of carving rubber, take a couple
of trial cuts and see how it works.