Making
a
Wire
Knife
A wire knife consists of a blade made from a piece of steel
wire installed in a pin vise.
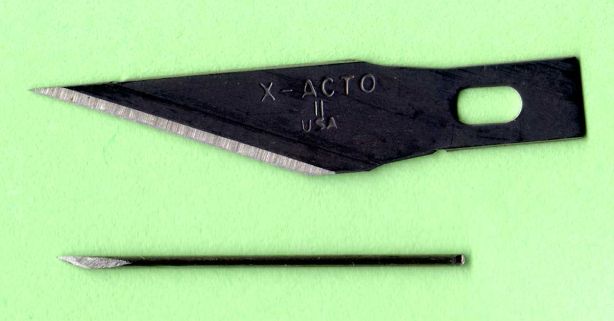
For the wire, visit a hobby shop
and purchase some "music wire", also known as "piano wire". I
suggest 0.032" (.81mm) size for reasons explained below, but really you
can use pretty much any size from 0.032" up to about 1/8". I
don't recommend any thinner than 0.032" because the wire gets too
flexible. Whatever you do, make sure the pin vise you have will
hold the wire size you choose. Music wire is cheap; you'll
probably spend about two bucks and get enough wire to make wire knives
for all your friends.
I know that you'll be tempted to buy several sizes of wire in order to
end up with several sizes of wire knife. The fact is, that's
pretty much a waste of time. Regardless of the size wire used,
the very tip of the wire knife -- which is what you cut with -- is
virtually identical. The only differences the size wire makes is
in the stiffness of the shank of the blade and in how much it obscures
your vision while carving.
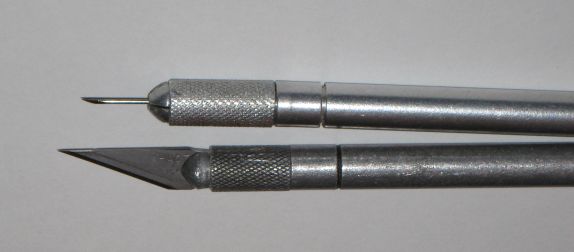
See Rubber Stamp Tools for tips on
obtaining a pin vise. My own personal
preference is to use a hobby knife handle of the type in which the
collet
has two splits forming an X when viewed end-on. This type handle
will only fit a
wire about 0.032" (.81mm) diameter, but actually that's a very workable
size wire for making wire knives so that's the size wire I use.
Another possibility is to use a drafting pencil. There are
mechanical pencils of various types that are designed to hold lead but
will hold steel wire just as well. The problem with some of them
is that they don't hold it particularly firmly, and may allow it to
wobble around while cutting. But there are types of mechanical
drafting pencils that have visible spring-loaded grips that hold a lead
quite firmly indeed. In fact, if your wire is too small for this
pencil to grip it, you can simply wrap some tape around the shank of
the wire to make it grip better.
Finally, if you're really cheap, you can just drill a tiny hole in the
end of a wooden dowel and glue in a piece of wire. Of course, if
you ruin that blade, you'll have to start over.
Insert a length of music wire into your pin vise and clamp it
securely. Then cut off the wire leaving about 5/8" protruding
from the collet.
Making a wire knife involves grinding two flats on the tip of this
wire. The two flats intersect to form the cutting edge. The
description below involves the use of a bench grinder. There are
other ways that will probably work, including use of a cut-off wheel
mounted in a Dremel.
Before proceeding, make sure there is a cup of water near your
grinder. And don a pair of strong reading glasses, +3.5 or so, to
help you see what you're doing. Be sure to observe all safety
precautions involved with a bench grinder, such as making sure long
hair is tied back and there's no loose clothing that could get involved.
The following is a detailed description of exactly how to hold the pin
vise while grinding the tip into a knife edge. It's not difficult
to do but it is rather difficult to describe clearly, so bear with
it. Heck, you can waste a couple of pieces of wire trying to
figure it out, the stuff isn't expensive.
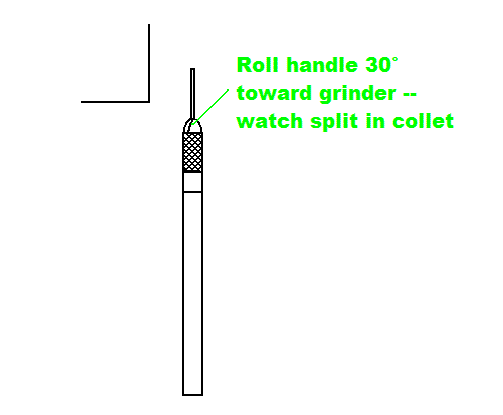
First, position the wire pointing directly away from you and parallel
to the grinding surface, as shown. Locate one of the splits in
the collet straight up.
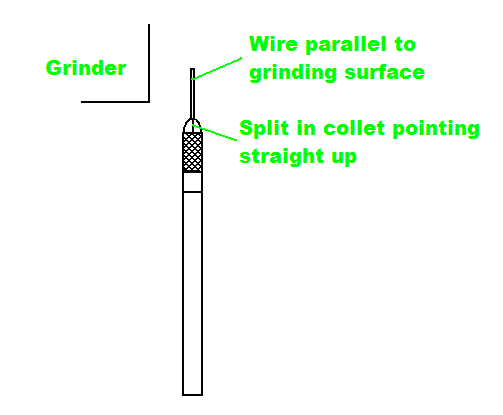
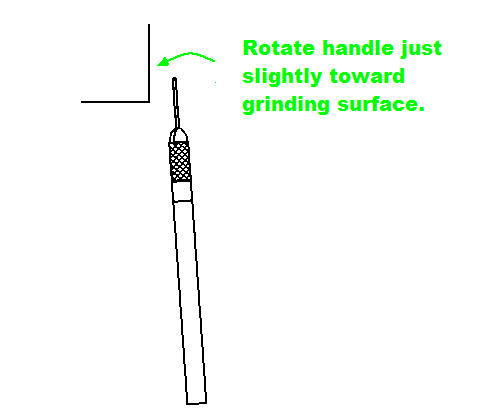
Next, roll the pin vise about 30° toward the grinder.
Finally, angle the tip of the wire just slightly toward the grinder.
I will elaborate a bit about this angle. If you tilt it just a
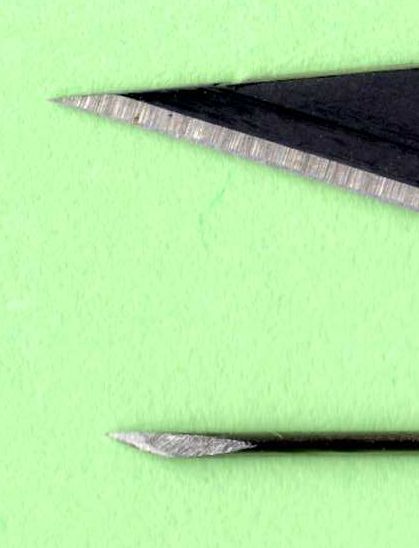
hair, you get a wire knife with a long slender point that looks like
this:
If you angle the tip a bit farther into the grinder, you get a somewhat
stubbier tip:

Neither of these tips is wrong; it's merely a matter of personal
preference. The long, slender point is excellent for carving the
most intricate details, but it's also very fragile and can easily get
bent if you get too forceful with it. The stubbier tip works fine
for most regular carving tasks and is much more rugged. The
difference between these two tips is only a couple of degrees when
angling that tip toward the grinder.
With the pin vise held in this orientation, move the tip of the wire
into the grinder. Try not to rotate it or let the angle change;
you're grinding a flat surface. Don't push too hard or the wire
will flex, which will affect the angle. Using a typical bench
grinder, grind no longer than about five seconds, then retreat and
immediately dip the point into the cup of water to cool it. You
want to be grinding the tip, not melting it!
Now, switch to the other side of the grinder, roll and angle the pin
vise exactly the opposite way, and grind exactly the same way on the
opposite side.
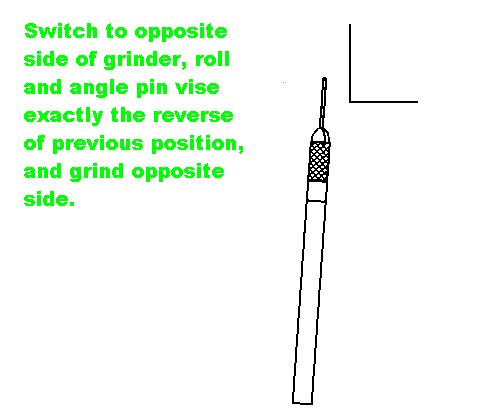
Again, only five seconds at a time, dipping in water each time to keep
the wire cool. Switch back and forth, side to side, always
holding the same positions when grinding. At first the tip will
look like a mess that doesn't resemble a cutting tool at all, but after
three or four times on each side, the two flats will come together at
the tip and quite suddenly it takes on the appearance of the
illustrations above.
You'll want to look carefully at your work and check to see if it's
symmetrical, that each side looks pretty much like a mirror image of
the other. If you are holding the pin vise at a slightly
different angle on one side than the other, you'll be able to see that
one side seems to have a longer face than the other. Adjust your
grinding positions and keep on grinding until it's right.
If you don't position the pin vise exactly the same way each time and
then make very brief cuts, you end up with a "faceted" surface; you see
a bit of this grind and a bit of that grind, all coming together in a
patchwork. So, the very last
grind you should make on each side
should be held steady against the stone for the full five seconds to
completely clean up the surface and ensure a single uniform flat
surface on each side.
It's already sharp, but it's not a good carving tool yet. You
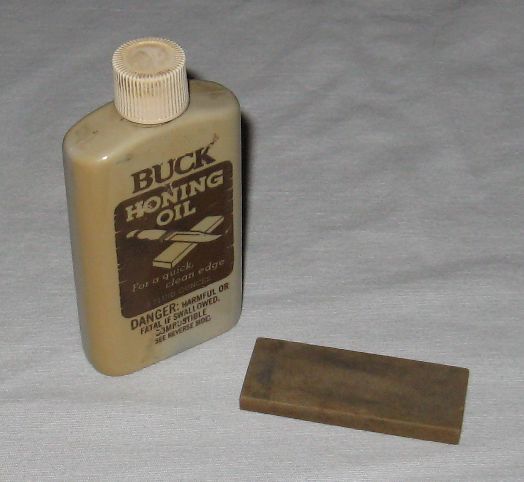
need to hone it. You will need a very fine knife sharpening stone
such as either an "Arkansas stone" or a flat ceramic sharpening block;
a typical knife sharpening stone -- the thing that looks like an 8"
long block of concrete -- is too coarse for this
job. You will also want to use some honing oil on the
stone. You can get both items from any place that sells fine
sporting knives.
Alternatively, you can get a diamond knife hone. Some have
multiple grits all in the same tool, but if you have a choice of grits
you want the finest available, usually 600 grit. You don't use
honing oil with a diamond hone; it works fine dry.
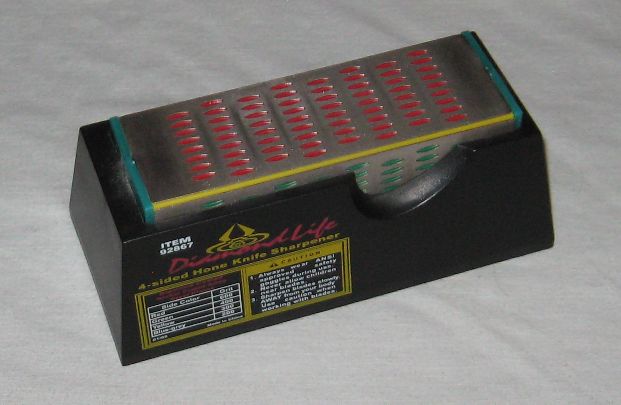
Diamond knife hones always seem to have a pattern of holes in the
surface. That works great for knives but it's unfortunate for
this job. You will need to be using an area without holes, such
as one end of the hone shown. You only need a tiny area.
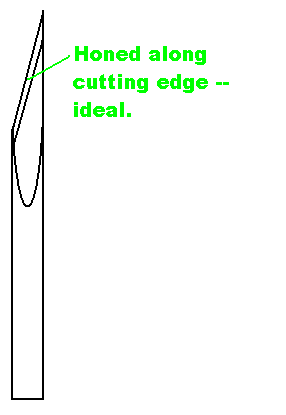
Wearing your strong reading glasses again -- it's the only way you'll
be able to see well enough -- position the pin vise so that one of the
flats is laying flat on the surface of the hone. Then roll the
handle just a couple of degrees up onto the cutting edge itself, so the
cutting edge is the only thing touching the hone -- but the entire cutting edge is touching the
hone, all the way from the point back to the heel. With the pin
vise held in this orientation, gently slide the tip around on the
surface of
the hone. Direction doesn't matter, toward the edge, away from
the edge, little circles, whatever works for you. After just a
few
strokes, flip it over and do the exact same thing on the opposite
side. If you do it right, you can clearly see the shiny honed
area on the edge of the blade, like this:
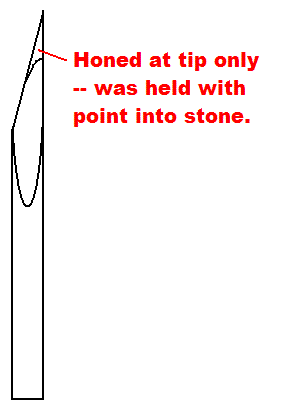
If you screwed up and leaned a bit too far towards the point, you'll
see the tip get polished rather than the entire length of the edge:
If you didn't roll it far enough up onto the edge, you'll get honing on
the back edge of the blade rather than the cutting edge:
Note that sometimes the grinding process leaves a bit of flashing right
along the cutting edge. You'll need to hone until this little
thread of metal comes off, and then continue honing until the edge
itself is smooth and sharp.
Once you get practiced at the honing process, try this: After
honing both sides, go back and hone both sides again only much lighter
-- just barely touching the stone, and only one or two strokes per
side. Ideally, the last couple of strokes should be feather-light.