Rubber
Stamp Carving Tools
There are several tools you will need to carve rubber
stamps, but note that you might not need all of these.
You'll need to read further to decide if you really need them
all.
- Magnifying lenses
- Lamp
- Hobby knife
- Gouges
- Carving needles
- Wire knife
- Sharpening tools
Before you start shopping, a word about coupons: If you
need to buy anything at Michael's, JoAnn Fabrics, Hobby Lobby,
A. C. Moore or similar hobby and craft shops, you might want to
look for coupons first. All of these stores often put a
40% off coupon in the local Sunday paper, and sometimes even a
50% off coupon. It's usually only good on one item, but if
one item is all you need, it's a good deal. You can, of
course, buy all the items you need one at a time, one per
week. Or you can collect coupons from all your neighbors'
newspapers. Sometimes you can sign up for their special
customer registration and they'll send you coupons by e-mail
that you can print on your own computer. Or you can visit
their web site and look at this week's flyer and print out a
coupon from there. And, when you get around to buying
something, be sure to check your receipt; it might contain another coupon, which
presumably means you can turn right around and go back into the
store and buy something else with it.
And sometimes these stores will accept each others'
coupons. Doesn't hurt to ask.
MAGNIFYING LENSES
When you carve rubber stamps, seeing up close and tiny is
important, especially if you're over 40 and your eyes don't work
like they used to. Buy a cheap pair of reading glasses,
the strongest you can find, like +3.0 or +3.5 or whatever.
These are way too strong for reading; the only way you'll be
able to focus is to hold things six inches from your nose.
That's just what you need! This is a good idea even if
you're young and your eyes still work up close, as it'll reduce
eye strain.
If you didn't believe that last paragraph, I urge you to
reconsider. The use of strong magnification is arguably
the most important tip on this site. Don't despair if you
put on a pair in the store and can't see across the room with
them on; that's not what you'll be using them for. Look at
your fingertips instead.
Michael's offers such reading glasses dirt cheap, like
$1 per pair -- and that's before
your 40% off coupon. You can also buy them at dollar
stores. There are lots of places that sell such reading
glasses for less than $10, including just about any drug store.
If you must wear prescription glasses for astigmatism, you won't
be able to see well using generic reading glasses, and you're
probably not interested in buying a special pair of prescription
glasses just for close work. You will need to find another
method of magnification that enables you to utilize your
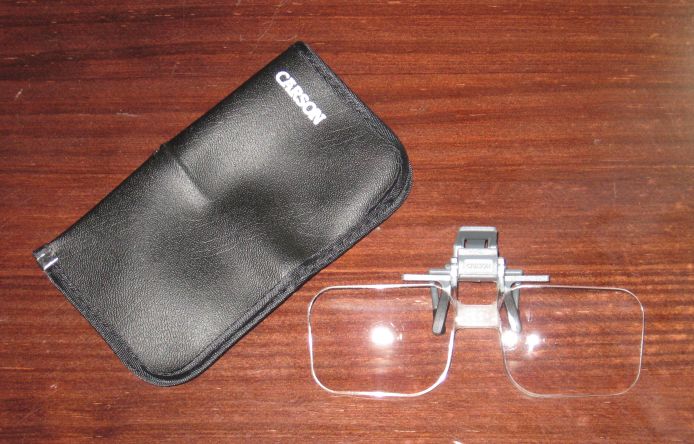
existing prescription glasses. One idea is to buy a pair
of clip-on lenses that attach to your prescription glasses.
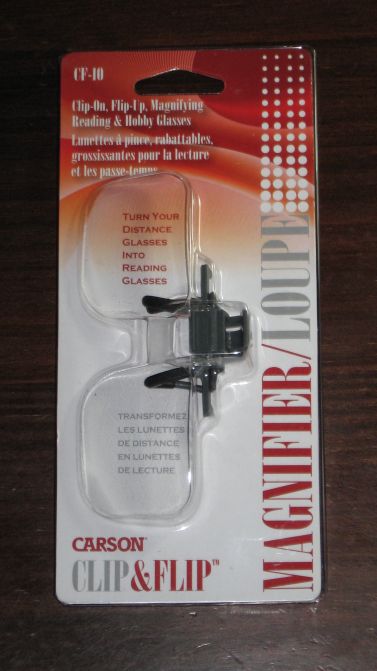
This Carson CF-10 was purchased at Michael's for less than $10
before the 40%-off coupon. It flips up when you want to
see something at a distance, and it comes with a cheesy
protective case to keep it from getting dinged up in your case
of carving tools. It doesn't say what magnification it is
on the package, but once open you'll see on the back of the
lenses themselves that it's marked +2.25.
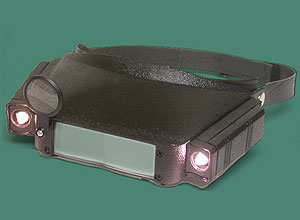
Another idea would be to purchase a magnifying visor. This
one has lights and a little pop-down lens for even more
magnification -- but only on your right eye.
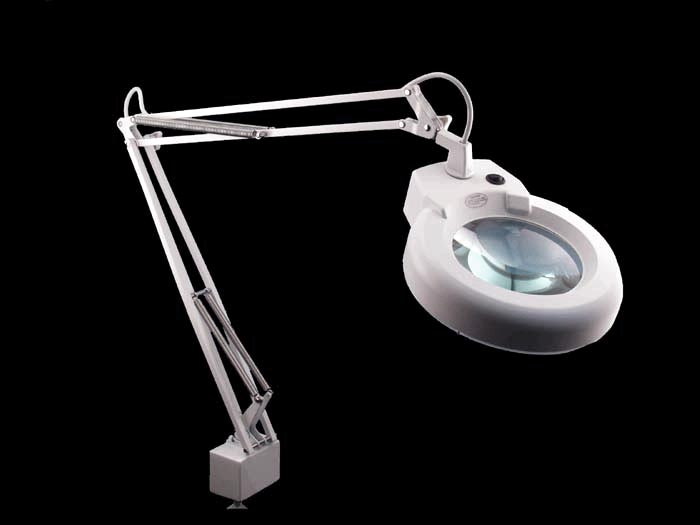
Or, you could buy one of those lamps with a magnifying
glass in it.
You can also get a magnifying glass that mounts on a small
stand that you can position over your work.
Oddly enough, it's actually plausible to use the reading glasses
or clip-on lenses with
a magnifying stand or lamp, for even more magnification.
LAMP
You'll want lots of light. I mean lots. In fact, my
preference is to carve outdoors in direct sunlight if the
weather permits. If you're working indoors, a strong desk
lamp right over your work would be good; two lamps would be
better! The new "compact flourescent" lights designed to
replace regular light bulbs are especially nice here because you
can get a lot of light up close to your work without a lot of
heat.
Some people prefer a "high intensity" light, a really bright
incandescent bulb with clear glass. The reason is that,
besides providing a good amount of light, the light all coming
from one point (rather than the entire tube surface of a
flourescent, for example) highlights the surface detail of the
item you're working on. If you want to try this, a halogen
bulb is recommended; they last much longer than regular bulbs
and provide whiter light.
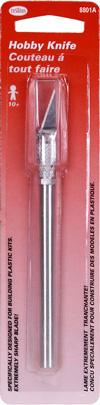
HOBBY KNIFE
You'll need a hobby knife. The traditional hobby knife
is the X-Acto brand with a #11 blade...

Another excellent choice is the Excel hobby knife. It's
available at HobbyTown and comes with "HobbyTown" stamped on the
handle -- but it doesn't say "Excel" on it anywhere. It's
also available at Hobby Lobby -- with Hobby Lobby stamped on the
handle. Wherever you get it, it's an excellent
knife. Excel claims that "the difference is in the edge",
and true enough, their blades are really sharp.
There are also cheaper hobby knives available from places like
dollar stores, Big Lots, etc. An
X-Acto knife has an aluminum collet that clamps down onto the
blade. These cheap hobby knives often have plastic
collets. Some of these are better
than others -- the difference being in how well the aluminum
handle holds the plastic collet -- but in general you'd want to
use these only for the actual carving, not for heavier tasks
such as slicing a chunk off your block of carving rubber.
Really, the all-aluminum hobby knives only cost a couple of
bucks; just get one.
There are also hobby knives in which the handle is hollow
through its entire length, the collet is the entire length of
the handle, and the tightening nut is on the back end rather
than up front where you grip it. These type are better for
two reasons: First, when you are applying a lot of force, trying to cut
something tough, the joint where the parts come together isn't
right under your thumb, it's at the other end. The end
you're pushing on is a straight tube, far less likely to bend or
break under the stress. Second, if you want to, you can
recess a blade way down into the collet so just a tiny tip of it
protrudes.
There are also hobby knives that are not pencil-shaped but
rather come in an assortment of shapes. There are handles
that are rectangular in cross section, which may make it easier
to keep the blade facing in the correct direction. There
are even hobby knives that fit around the index finger.
Regarding the blades themselves, the Excel
and X-Acto #11 blades are stout and sturdy, being about .020"
thick. While excellent quality and great for many tasks,
this makes them a bit too large and clumsy for detailed rubber
stamp carving. The blades in some of the cheaper sets are
only about .015" thick which means they're thinner and more
flexible than the X-Acto blade, which is beneficial here.
I believe the Testors blades are also thinner than the
X-Acto. If you already have an X-Acto knife, you
might want to purchase a set of Testors blades and try them in
it.
If you're a doctor, you can steal a surgical scalpel from
work. Interestingly, the most common surgical blade is
also called a #11, although it's shaped slightly differently
than the X-Acto #11. Surprisingly, scalpel blades haven't
proven especially good for rubber stamp carving. The
X-Acto #11 is probably better.
One other tidbit about hobby knives: When you get to
carving very tiny details, you'd think you want the smallest
blade. However, what you really want is the blade with the
pointiest tip, which is not necessarily the same thing.
Here are some blades:
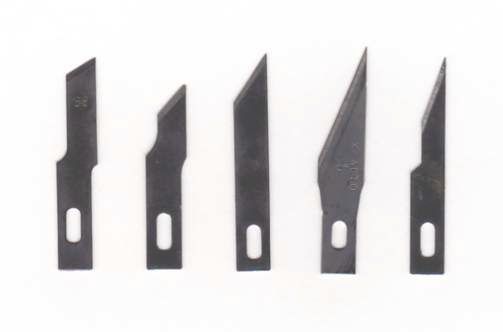
The one on the far left would be really lousy for carving rubber
stamps. The angle of the cutting edge forms such a blunt
angle at the tip that you'll have trouble cutting any
details. It might work OK for making long, straight cuts.
Moving to the right we find increasingly better blades because
the angle formed at the tip is more acute. As a result,
the very point -- which is the part you actually carve with --
is increasingly tiny and slender.
The second from right is a standard X-Acto #11. The one on
the far right is from a cheap set from Big Lots.
It's
easy
to
change
direction
mid-cut
with
such a blade, because you can easily turn the tip in the rubber.
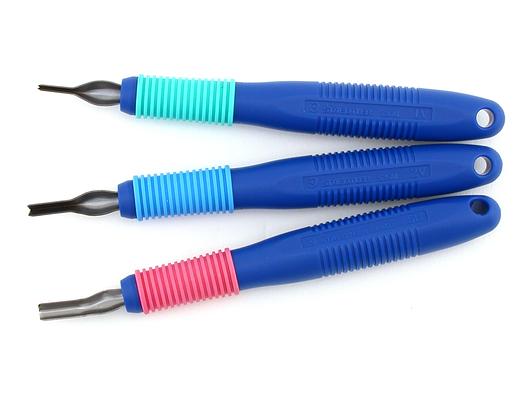
GOUGES
Buy a Staedtler 1V gouge. Period. End of
discussion.
Generally, to get a 1V you'll have to buy the entire Staedtler
set of three gouges for about $20:
There's nothing interchangeable about the nibs, you're buying
a set of complete tools. The cutting
edges of these tools are U- or V-shaped, and the nib is gently
curved to enable smoothly cutting out a groove with one
pass. The 1V is the one at the top in the picture, and
with it you can easily remove a sliver of rubber the size of a
human hair from the surface of a piece of rubber.
It's
the
tool used for 95% of the rubber stamp carving duties, with the
others only used for removing great big chunks of rubber.
There is one way to buy the 1V by itself, and that's to buy from
Webfoot at stampeaz.com.
That
is reportedly the only
place where you can buy the Staedtler 1V without buying the 2V
and 5U as well. Buy some Brilliance Dew Drop ink pads
while you're there. And don't lose the invoice that comes
with your order; Webfoot applies a rubber stamp image to them,
and you can log them as letterboxing finds on AtlasQuest.com.
Update 4/2012: Webfoot reports that Staedtler has ceased
manufacturing gouges. If you have one, hang on to
it! They can be resharpened indefinitely. If you
don't have one yet, Webfoot still has a few, as she bought out
the last of Staedtler's stock.
The Staedtler 1V is essential for detailed carving, but larger
gouges are nice to have for other duties such as hacking big
chunks of rubber out of a stamp. You could just buy the
whole Staedtler set. But it'd probably be cheaper to just
buy the single Staedtler 1V from stampeaz.com and buy a Speedball
"CUTTER
SET For Block Printing" for the other needs. The Speedball
set includes a cutter handle and five
interchangeable cutter blades.
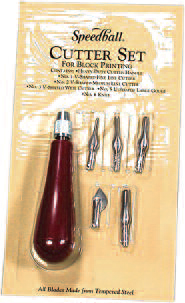
The blades included in the package are #1, #2, #3, #5, and
#6. The #1 is the smallest, but it still makes a groove
twice as wide as a Staedtler 1V.
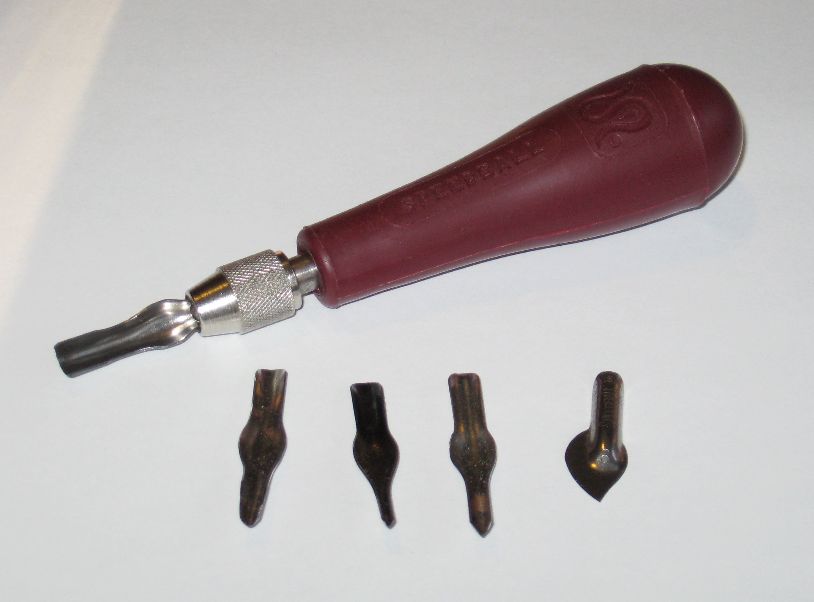
The handle is a rounded plastic affair with a chuck on the end
that securely clamps down onto the blade. It's hollow and
it's possible to pry the back end off and hide blades inside,
although that doesn't appear to be the intention of the design.
Hobby Lobby now offers a blatant copy of the Speedball Cutter
Set, with a handle that looks almost exactly the same except
it's a different color and five nibs that are essentially
identical. This set sells for considerably less than the
Speedball product. As of this writing I have no reports on
whether this kit is any good, but it certainly appears to be
usable.
The bulbous handle that comes with these kits is well-suited for
applying great force while digging a groove. However,
you're cutting rubber, and great force is not required.
Rather than constantly swapping nibs out on the single handle,
many opt to purchase some Speedball "pen holders", which are
often sold nearby on the same shelf as the cutter set for less
than $2 each, and press one nib into each handle. The
bulbous handle is a good choice for holding the #5, which is a
large U-shaped nib for scooping out big chunks; put all the
other nibs into these slender pen holders.
You can also just buy a length of 1/4"
wooden dowel and attach the nib with glue, wire and/or
tape. Get enough dowels to make handles for each nib, as
you won't want to have to swap nibs on the same handle.
Some people opt to use no holder at all, just hold the nib
itself between the thumb and forefinger. This actually
works better than you'd expect.
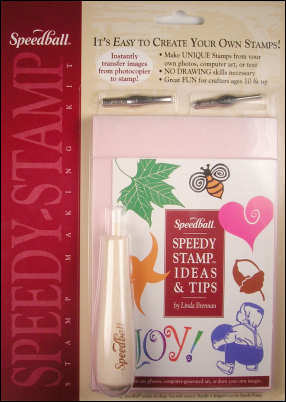
Speedball also offers a "Speedy-Stamp Stamp Making Kit" which
includes a cutter handle, two cutter blades, a 4" x 6" piece of
Speedy-Carve pink rubber, and a booklet of ideas and tips.
It looks like a good starter kit, but there are two downsides
to it. First, the cutter handle included is a cheap wooden
handle rather than the nice plastic handle with the metal chuck
shown above. Second, the two cutter blades included are a
#2 and a #4, not the most generally useful blades.
There are other brands of gouges available, including some
rather expensive "woodcutting" tools, but none are any better
than the Staedtler 1V for detail carving.
Nasco also offers sets of lino
cutters, including wooden handles in either palm-grip
or pen-shaped
versions. Those pen-shaped handles come in a box of 12
(Nasco is actually a classroom supply outfit), but they're still
not too expensive.
Speedball also offers some supposedly safer lino cutters that
look similar from a distance but you pull them across the rubber
rather than push. Hence, the sharp edge isn't right out
front where you can hurt yourself with it, it's underneath and
facing the holder. I've never tried them myself, but
reports indicate that they do
work but not particularly well.
Having both the hobby knife and the set of gouges is
best, obviously, but you can make do with just the hobby
knife. It's work, though, since you must make slice after
slice side-by-side to remove rubber over a broad area.
It's just easier to have a couple of gouges on hand, even if
you're a hobby knife carver.
MODIFIED GOUGES
For those who want more detail than they can get from
off-the-shelf carving tools, there are three popular
modifications of gouges: Pinching, reversing, and miniaturization.
I
personally
developed the last idea, the miniaturization.
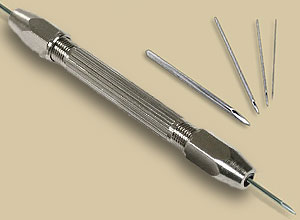
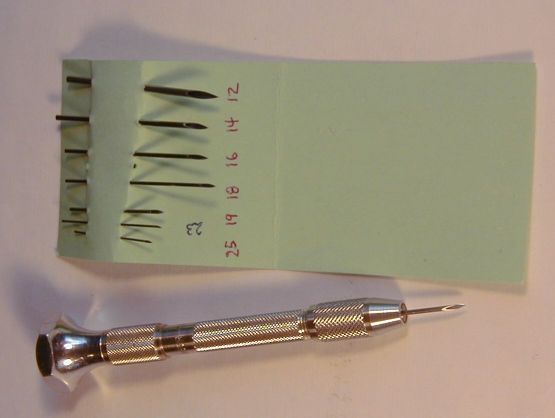
CARVING NEEDLES
When you get to the point where you just can't figure out how
you're supposed to carve any serious detail with those big,
clunky hobby knives and gouges, you're ready for a set of
carving needles.
Because it's not obvious, I'll describe how they are
used: Pretty much the same way as the hobby knife.
It doesn't look like a hobby knife; in fact, it looks more like
a gouge. It won't work at all as a gouge, though, it just
digs in if you try. You use it the same way you'd use a
very tiny hobby knife. Slice with one side of that tip;
you've got two sides to work with.
Where do you buy carving needles? Actually, you buy the
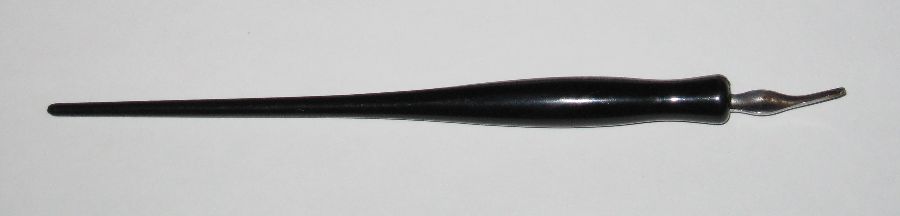
components and assemble your own set. The handle is what's
known as a "pin vise" and can be purchased locally from Hobby
Lobby or other hobby shops or from ehobbytools.com
or you can do a web search for other sources. You can
select a single-ended pin vise:
(the knob end is removable, revealing a place to store the
unused collet)
or a double-ended pin vise:

Offhand, I'd suggest the single-ended; there's only half the
chance you'll accidentally stick yourself. Of course, you
could buy the double-ended pin vise and only install a needle in
one end at a time.
There are cheaper versions than those shown. The collets
shown have four sizes of opening so they'll hold just about any
size needle you want, and you can bury the needle quite a
ways. Cheaper pin vises have no removable collets but
rather just a chuck formed in the end of the handle itself. With
these, you're far more limited in what needles will fit -- too
large won't go in, too small will fall out. And the
needles might bottom in the hole, requiring you to cut the
needle shorter to get it to protrude the right amount.
The X-Acto hobby knife usually comes with a collet with only a
single split for holding the blade, but the Excel hobby knife
has two splits forming an X when you look at it end-on.
The Excel type will work as a pin vise, although they'll only
hold a pretty small needle, about a 19 or 20 gauge. Still,
it's an attractive option because the hobby knife handle is
lightweight aluminum, long and slender and comfortable to hold,
while the regular pin vises are often steel, heavy, and somewhat
short and clunky to hold. Plus, if you choose an Excel
hobby knife to begin with, you can try using it with either the
blade or the needle and see how you like it.
Other types of hobby knives sometimes have a collet with a
single split but there's also a pilot hole down the center of
the split for holding something wire- or needle-shaped, but
again you'll need to use exactly the right size needle with it.
The carving needles themselves are, in fact, standard hypodermic
needles. They come with razor sharp edges right out of the
package, and are available in many sizes. You'll need to
cut the other end off, the end with a collar that attaches the
needle to a syringe, in order to install it into the pin
vise. Some people get the wrong idea and try to carve with
the needle holding it by the collar, and sometimes even still
attached to a syringe. This is like trying to write while
holding a pencil by the eraser end.
To begin with, go to a feed store and ask about needles intended
for horses. You'll find some really big needles -- big
enough to make you thank your lucky stars you're not a horse --
and these big needles are the most useful for carving rubber
stamps. You should be able to find 16 gauge, 18 gauge, and
possibly 14 and 12 gauge needles. Be sure to get long
ones; the short needles are barely long enough to chuck up in a
pin vise. Here's what the needle looks like when you buy
it:
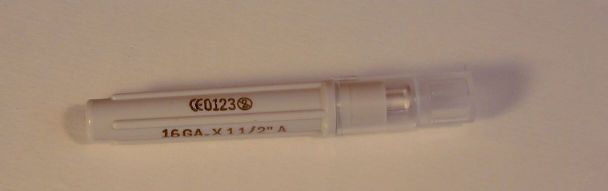
This thing cost me 35¢. Here's what it looks like
when you open the package:
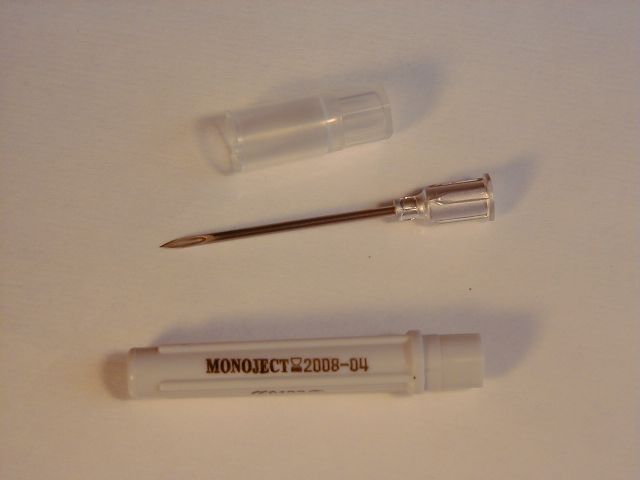
You'll need to cut the needle itself off that collar, and
throw the rest away.
When you want smaller needles for really detailed work, go to
your local pharmacy and ask for needles for human beings.
In general, they're not out where you can get at them, they're
behind the pharmacy counter, but all you have to do is ask; no
prescription required. I just tell them what I want them
for, to which they usually reply "Good idea!"
You'll be offered needles around 19 gauge to 25 gauge -- be sure
to get the long ones again. Often the needle comes
attached to a syringe, but they're still only 30¢ each or
so. If you ask for a "larger" needle, the clerk will always presume you mean you
want a larger syringe, more cc's. You'll go back and forth
a coupla times trying to get through that you want the needle
itself larger and couldn't care less about the size of the
syringe attached.
The latest thing in hypodermic needles are retractable
needles. You use them once, and the needle itself pops
back inside the syringe so you can't stick yourself with
it. I haven't run across one of these myself yet, but
hopefully since you won't be shooting up with it you can cut the
needle off before it gets a chance to retract. We might
need to hope so, since reportedly these retractable needles will
be increasingly popular thanks to liability concerns.
WIRE KNIVES
Better idea: Skip the carving needles
altogether and fabricate a "wire knife" instead. It is my
own invention, so I provide a description on how to make one. A wire knife
will handle whatever the carver is capable of carving; there
will never be any call for anything smaller or more
precise. And it's easier to get used to using than carving
needles.
CUSTOM TOOLS
You can actually create custom cutting tools if
you're handy. It's possible to grind a hobby knife blade
into an entirely new shape and then grind a new edge on it and
sharpen it up -- or you can cut only on the back edge or
mounting tang, leaving the original cutting edge intact.
The obvious thing to start with is another cutting tool, but you
can actually make cutters out of all sorts of things.
Rubber isn't difficult to cut, you don't need surgical steel to
cut it. Sometimes, when you need to create a particular
type of cut -- especially if you need to make the same cut a lot
of times -- the thing to do is to make a tool just for the job.
One common homemade tool is a tubular tool for cutting
circles. If you visit a serious hobby shop -- the type
place with remote control airplanes and model trains -- you can
buy a selection of brass tubing in 1/16" increments. Chuck
each tube into a drill or lathe and grind the inside edge only,
forming a sharp edge at the outer surface. Then flip the
tube and grind the other end at the outside edge only, forming a
sharp edge at the inner surface. Use one end for making a
white circle within a black area, and the other for making a
black circle within a white area. Only press the tube a
millimeter or so into the rubber, and then come back and cut the
rubber away with a gouge using the shallow cut as a guide.
For much smaller circles, substitute a selection of hypodermic
needles of various sizes for the tubing. Cut the sharp
points and the mounting flanges off and throw them away, leaving
just the tiny tubes, then sharpen them up as described above.
One other nifty tool to have: a tip cleaner for an
acetylene torch. These can be purchased at any place that
sells welding supplies for perhaps a dollar. It's a little
metal matchbook case containing a dozen or so tiny wires of
different sizes for cleaning out the nozzles in a welding
torch. What you'll use them for is to poke holes in
rubber. By poking straight down into rubber, a plug the
same diameter as the wire is pressed down into the rubber and
doesn't come back up, leaving a tiny white dot in the black area
of the image. By choosing the different size wires, you
can make a starry night sky in minutes. Of course, you can
accomplish the same function with any selection of various sizes
of wire, the tip cleaner is just cheap and convenient.
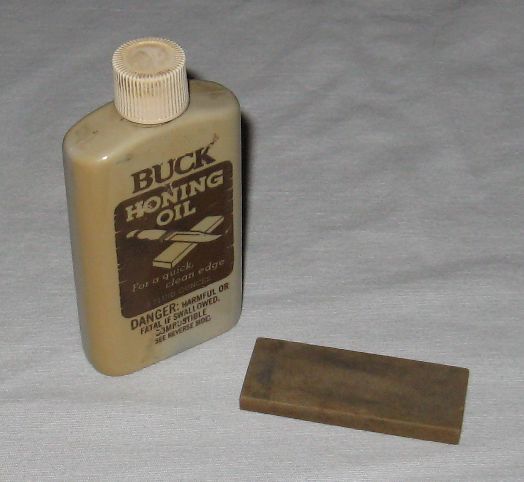
SHARPENING TOOLS
You should sharpen your cutting tools occasionally, so you'll
need sharpening tools. Go to a fine
sporting goods or knife store and see what they have in
sharpening stones. Tell them you want a really fine one;
the thing that looks like a gray chunk of concrete with a coarse
side and a fine side will not
work here, both sides are far too coarse. With any luck at
all, you'll be able to get a small, very fine "Arkansas" stone
for just a few bucks. If they have something ceramic you
might check it out; ceramic is even finer than Arkansas
stone. Be sure to get something with a flat surface; you
can't use rods or other shapes for sharpening stamp carving
tools effectively. If you get an
Arkansas stone you should also get some honing oil; it's
essential with an Arkansas stone.
Alternatively, you can get a diamond hone. Harbor Freight
Tools offers several models, usually with multiple surfaces with
different grits. You'll be using the finer grits, 400 and
600, for this job. Don't use honing oil with diamond
hones, just use them dry; you can rub the metal dust right off
them with your finger when done. The problem with diamond
hones is that they are covered with holes, which might work for
knives but it just ruins their use for sharpening hobby knives
and gouges. Look for a diamond hone that has a flat area
on the end beyond the holes that you can use. You only
need a couple of square inches.
Some have also had success with a very fine sandpaper, 400 or
600 grit, taped down onto a very flat, hard surface such as a
piece of plate glass. While this works, you have to be
careful to move the tools only in the pulling direction; trying
to slide the tool in the wrong direction across the sandpaper
may cause it to tear, or even if it doesn't tear in might bunch
up a bit and dull your tool rather than sharpen it.
You can sharpen the hobby knife blades
just as you would hone a knife: Hold the blade flat
against the stone and tilt the back side up just enough so that
the cutting edge contacts the surface of the stone. Make
about a dozen circular motions, then flip it over and
repeat. As you finish, make the last couple of strokes
feather light and swap sides each stroke. You won't
believe how much better this'll make the blade cut -- even
compared to a new blade. You also won't believe how long
it'll make a blade last.
You also should sharpen the gouges every now and then.
Sharpening gouges is more involved, so I have established an
entire web page
describing the process.
Navigate to: