Assembling a
Rubber Stamp Blank
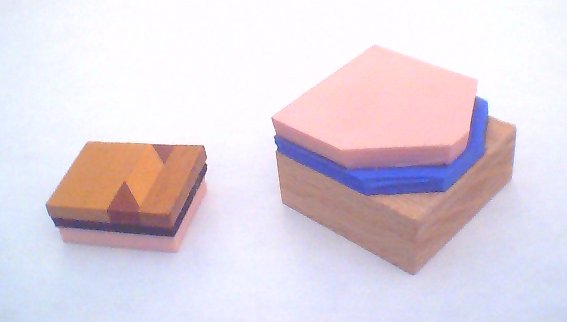
A complete rubber stamp is an assembly of three layers of
material: a
layer of rubber bonded to a layer of soft, squishy foam, which in turn
is bonded to a rigid backing. When used, the stamping pressure
applied should be distributed uniformly across the area of the stamp by
the rigid backing, and the soft foam should compress slightly to ensure
that the entire surface of the rubber is brought into contact with the
paper.
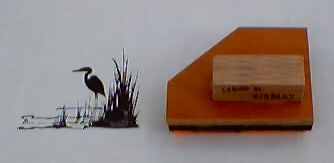
Sometimes you can find ready-made 3-layer blank rubber stamps
in
a
crafts store. They look just like the many pre-made stamps
available and are usually in there somewhere on the same rack, but
instead of a cute picture on the top they have either a solid black
rectangle or circle or some text reminding you to carve a mirror
image. Buying one of these items
would obviously save you the time and effort of assembling your
own. The cost is usually more than you would spend
making your own, though. There is also a question of
durability; Speedy-Stamp,
MasterCarve and PZ Kut are known to hold up well inside a letterbox in
the
wilderness, but the durability of the commercially-made blanks under
such conditions is unknown at this point.
I normally choose my artwork before assembling my stamp blank so that
I can assemble a stamp blank that is precisely the correct size for the
artwork. However, it's also acceptable to turn this idea around,
make the stamp blank first, and then select and size artwork to fit
it. You can even just make blanks that are too big, although this
obviously wastes materials and also results in big, clunky stamps when
smaller, more compact ones would work.
The first step is cutting out a piece of rubber to a suitable size and
shape
with a hobby knife (a boxcutter will also work). Leave at least
1/8" of rubber beyond any edge of the design; this gives you some
tolerance for lining things up when you apply the image, and it
improves rubber stamp durability bouncing around in a
letterbox in the woods or wherever. You can just cut out a big
rectangle, or you can try to be more thrifty with the rubber and just
cut right around the outline of the image itself.
Here's a convenient way to do this: If the image is on the
computer, mirror-image it ("flip horizontally"), then print it on a
piece of card stock or cover stock. Cut
out the image with scissors or a paper slicer. Lay it on the
rubber and mark all around it with a pen or pencil, then
cut out the rubber along the outline marked. If you're preparing
several stamps at once, you can slide these little cutouts around on
the rubber to figure out how to fit them best and waste the least
material.
Cut out a piece of wood or backing material to fit the
rubber. If your rubber is some oddball shape and size, you'll
probably choose to make the
wood a simple rectangle or circle.
Remember that
just because your computer prints out an image in a
particular orientation on paper doesn't mean you must align the
rectangular
stamp that way. Sometimes you can rotate the rectangle to some
other position that allows you to fit the entire image within a smaller
rectangle.
Cut out a
piece of
foam the same size and shape as the rubber, or perhaps a little
bigger. Or, cut out a piece the same size and shape as the block
of wood. Your choice. One suggestion, though: If
there is a large area of the image that's blank white, don't put any
foam behind this area. Cut a hole in the middle of the foam if
necessary. This helps distribute the stamping pressure over the
inked areas better and reduces unwanted stray marks when stamping.
Glue the foam to the backing material
first, and then
glue the
rubber to the foam. I suggest that order because gluing the foam
to the backing piece first will hold the foam flat while you're gluing
the rubber to it. For those not familiar with contact cement, you
apply it to both surfaces, allow it to dry until tacky, and then put
the parts together. If you put them together while it's still
wet, they won't bond. They also won't bond if you wait too long,
the stuff dries beyond tacky to simply inert. With most contact
cements such as the standard Weldwood, the optimum drying time is about
15 minutes.
If you're using peel-and-stick foam pipe insulating tape for the foam
layer, you don't need to use glue at all at that joint; it will stick
to the wood backing just fine.
An alternative idea to the contact cement: If you stop by your
local auto parts store, you can pick up a can of Permatex "Heavy Duty
Headliner & Carpet Adhesive". This is contact cement that
comes in a
spray can. It is formulated for automobile headliners, which
means it
can handle being left in a parking lot on a hot sunny day without
coming apart. I find this stuff is preferable to the standard
bottle of Weldwood contact cement with the brush in the cap for a
couple of reasons. For one thing, the glue in the spray can never
dries out, you can leave it on the shelf for five years and it's still
good as new. For another, it's actually cheaper to use,
especially if you consider how much glue you can use from the
little bottle before you have to throw it out with a bunch of dried-up
glue in the bottom that the brush can't reach.
If you can't find the Permatex product, 3M "Super
Trim
Adhesive", part no. 08090 is the same thing except it costs twice as
much -- but it's probably easier to find.
Note: There might be cans of 3M "Trim Adhesive", part no. 08088,
right next to it on the shelf. Don't get that stuff, it's not as
good as the "Super Trim Adhesive".
To use the spray glue, spray it on the surfaces you intend to glue --
right in the middle. If you aim at the edges, you're gonna miss
and get glue everywhere. Spray a blob right in the middle, then
use a Q-tip or toothpick to spread it around. It's thinner than
the stuff in
the little bottle, so it spreads better. Alternatively, you can
just mate the two parts together, wiggle them around a bit to spread
the glue over both surfaces, then pull them apart and set them aside to
dry.
Note: The spray glue doesn't seem to work too well on some types
of rubber, most notably white vinyl erasers. Apparently there's
something in the rubber that
dissolves the glue. You would be well advised to try some other
type of glue with those erasers.
There is another method of assembling a stamp that
involves two pieces of
wood.
Basically, you make the stamp as described above with a 1/4" thick wood
backing. Then you glue another, smaller piece of wood on top of
that as a knob. It works really well, providing a very
comfortable grip and keeping fingers out of the ink. In cases
where the stamp image requires more
pressure on one side than the other, you can glue the handle shifted
over toward that side to encourage successful stamping.
When assembling a stamp of this type, I usually bond the foam and
rubber to the thin layer of wood, then do the carving. After
carving I glue on the second piece of wood for the handle. For
bonding wood to wood, dampen the small piece of wood and use Gorilla
Glue or the Elmer's equivalent; it takes four hours to dry, but it
holds wood to wood very reliably. Note that you will need to
"clamp" it while drying, which I usually do by setting the stamp face
down and putting a weight on top of the handle.
For another handle idea you can visit Home Depot or Lowe's and
buy a knob intended for a cabinet or drawer and put it on there.
Note, however, that such knobs usually attach with a screw from the
other side, which means the screw will need to be in place in the
backing before the foam
and rubber are bonded to it. What I usually do is to buy a flush
head screw, drill and countersink the wood, and install the screw
before bonding the foam -- but don't install the knob itself yet.
Then I drill a hole in a piece of scrap wood and set the protruding
screw down in it while carving. After the stamp is completed,
it's a simple matter to screw the knob on.
After assembling (or buying) your 3-layer
blank, if you have any concerns whatsoever about the suitability of the
rubber surface for carving a stamp now is the time to address
it. If it's not perfectly flat and smooth, you need to perform an
"acetone scrub": Take a piece of cotton cloth (a piece torn from
an old
T-shirt
works nicely), soak a small area with acetone, and stretch it over
a flat surface. Quickly, before the acetone evaporates, set your
bonded blank rubber stamp
assembly face down onto the wet cloth and slide it back and
forth. The acetone will dissolve the surface of the rubber and
the cloth will wipe some of it away. This
will clean and prepare the surface, and
it will ensure that the surface is truly flat prior to carving.
This step is especially recommended if you're using an eraser.
If you're working with unmounted rubber, just flip
this procedure upside-down. Lay the rubber on a flat
surface. Wrap the cloth around a wooden block so it's stretched
flat across the surface, soak it with some acetone, and apply it to the
rubber and rub it back and forth.
It's
not a bad idea to use this process on every
stamp; it will always result in an excellent surface for carving, even
clearing up problems with the rubber that you didn't even notice.
If your Speedy-Carve has any pimples or other
defects, you'll want to use this treatment to get rid of them.
Fortunately, most of the surface
of a block of Speedy-Carve is perfect as is, no real need to clean up
the
surface in this manner.
Navigate to: