For me, the biggest challenge of carving a rubber stamp is
coming
up
with a stamp design. When you first start out, you're
usually
looking for something that looks easy to carve, but as you gain
confidence in your carving prowess you look for images that
provide
more of a challenge. Finally, you look for images that are
really
pretty; it doesn't matter how impressive the carving job is if
the
image is ugly.
If you are making a personal "signature" rubber stamp for
letterboxing,
remember
that some of the logbooks you'll be stamping into will be pretty
small. If your signature stamp is large, sooner or later
you'll have to stamp just one edge or corner of it into a small
logbook. You might think about your design, and consider
how you
would use your stamp to stamp into a small logbook. For
example,
if you include your trail name in the design, you'll probably
want that
to appear in the logbook, and that'll be easier if your name
appears
towards one side or one corner rather than right in the center.
There are two ways to obtain images suitable for carving into
rubber
stamps: draw them yourself, or find existing artwork of someone
else's
and adapt it for your use.
DRAWING YOUR OWN
If you have any modicum of artistic talent, you should
definitely
try
your hand at drawing images. For some reason, being
rendered in
rubber seems to make relatively simple designs look good.
Things
that look like mediocre scribblings in pencil on notebook paper
can
actually end up looking quite impressive as rubber stamp
images.
If you're carving rubber stamps for letterboxing, you can also
draw
unique images to fit each location for your letterboxes.
FINDING AN IMAGE
I personally have all the artistic flair of a
mechanical engineer. Although I have drawn a few of my own
designs for stamps, what I generally do is log on to the
internet, go to www.google.com,
select "image search", and type in
whatever keywords I want and see what it comes up with.
Make
sure you "click to see full-size image". Try to
avoid using images that will obviously bring on copyright or
trademark
concerns.
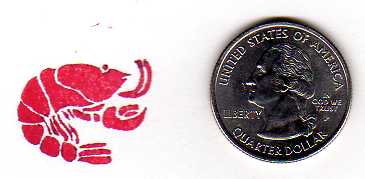
You're looking for a design that involves solid blocks of a
single
color. Narrow straight lines are difficult to carve (you
have to
cut away both sides, leaving a constant width if you want it to
look
right) and curved lines are even harder. Note that
sometimes
you can cheat and carve a "negative", leaving the background
solid and
cutting away the design instead of the other way around.
That
makes lines a little easier, since you're just cutting a narrow
groove.
It is tempting to specify "black and white" images only for that
Google
image search. I've found it's better to let it search for
color
images, though, for three reasons: 1) you often find
images with
multiple colors that you can readily alter to make a
black-and-white
design; 2) you sometimes find images that are just one
color, but
it's not black; and 3) you'd be amazed how many black-and-white
images
on the web are actually saved as color image files.
When you find an image you like, save it to your hard drive
(right-click on the image itself, if you're using a PC).
You may
then need
to tweak the design some. Using some sort of photo editing
software, you may need to remove some features, draw stuff in,
change
several colors into one color (you only have one color to work
with!),
etc., etc.
You might also opt to modify designs enough
that they will scarcely be
recognizable as based on someone else's original image.
Consider downloading Irfanview
(free!).
Irfanview is a graphic viewing/editing package with lots of
features
including an editing toolbar. It's also the best software
to use
to print your images
when
done, as it allows you to specify the size of the image and the
location on the paper.
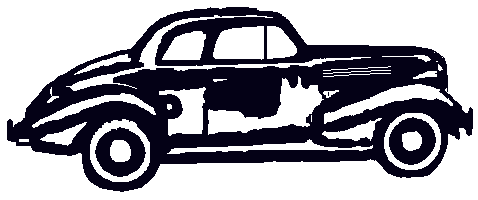
One quick modification is to mirror-image (horizontal flip) the
original
artwork. However, note a couple of things to watch out
for.
If there is any text in the image, obviously you don't want that
mirror-imaged. If you mirror-image a car, the steering
wheel may
end up on the wrong side, or it can end up driving on the wrong
side of
the road. A person doing something with his hands may
suddenly
look like a lefty.
You can "Decrease Color Depth" and convert the
image to a 2-color image. Actually, what often works
better is to
reduce the color depth to 16 colors, and then use the "Fill With
Color"
feature to change the color of
entire sections of the image at one time. Besides allowing
you to
manually choose which areas will be black and which will be
white,
having 16 colors also allows you to use colors other than black
and
white as "placeholders". For example, you can
convert
a white area to red, convert an adjacent black area to white,
then
convert the red area to black.
Another thing you can do is to edit the palette.
In Irfanview you can selectively change each color in the
original
image to either
black or white until you end up with the image you're looking
for. It's a good idea to decrease the color depth to 16
colors
before doing this, otherwise you'll be having to edit 256 colors
on
that palette. You might even opt to select a custom number
of
colors and type in 8 or thereabouts.
Eventually you probably will want to manually white out
some
stray marks and otherwise clean it
up. Of course, you can forget about that and just ignore
the
stray marks when carving the rubber if you prefer.
For some of these tasks, I actually prefer MS Paint over
Irfanview. I simply save my work in Irfanview and close
it, then
reopen the image in Paint and go from there. Irfanview
will do
pretty much whatever you need to do, I just prefer the way MS
Paint
works for some tasks.
Besides the Google search, there are several other methods of
obtaining
images that have worked for me. If you have a flatbed
scanner,
you can scan anything you can find -- either around the house,
in your
junk mail, or at the public library.
Note that things you can scan on a
flatbed scanner include a lot more than printed images on
paper.
You can often successfully scan solid objects. Lay a key
on it,
or your watch, or perhaps a Christmas ornament. The
pictures of the packages of
Speedy-Stamp on the materials
page were made by laying them on a
flatbed scanner.
Another idea is to carry around a digital camera, and when you
see some
artwork on a road sign or the side of a truck that would make a
good
rubber stamp, just take a picture of it.
You can do this with a
film camera if you have a scanner; just lay the print on the
scanner.
MAKING ARTWORK FROM
PHOTOGRAPHS
It's also possible to convert an ordinary photograph into
suitable
art
for making a rubber stamp. The following are some ideas on
how to
do this. Note that sometimes you have to open the file in
one
software package, do one step, then save and reopen it in a
different
software package to use some other feature. If
you
start with a JPEG file, you might find that converting it into a
GIF or a TIF is a good idea because it may be easier to manually
edit
with the software you have. Converting it to a BMP file is
usually recommended because repeatedly opening and saving a JPG
results
in a gradual deterioration of the image.
You can try increasing the contrast drastically, making
everything
either black or white. If too much stuff is either black
or
white, start
over and adjust the brightness first, then try boosting the
contrast
again.
Sometimes a software package gives you more options.
MicroSoft
Photo Editor actually has a function called
"stamp" which will automagically convert any photograph into
something
that might be carvable into a rubber stamp, but it may end up
unrecognizable. Sometimes it helps to do some fiddling
with the
photo before applying the stamp function, such as trimming away
all the
background stuff. The good news: if you get this method to
actually work, you'll end up with a really unique design; the
finished
image is often reminiscent of really stylized artwork.
OUTLINES
One idea that's worth pondering is the notion that
the
image
prepared doesn't necessarily have to be the same as the final
image
intended for the stamp. It could merely be a guideline of
sorts,
something that tells you where to carve. One example: you
might
consider generating an image on the computer that shows just
the outline of the final image. In other words, it shows
where to
cut. This requires a bit more thought when carving,
because you
must mentally note which areas are supposed to end up inked (and
therefore the rubber is to remain) and which areas are not (and
therefore the rubber gets cut away). Printing the image on
paper
first and coloring it in may help clarify which areas should be
cut
away.
Irfanview has
a feature called
"edge detection". You start with a photograph, hit the
button,
and it shows you a black screen with all the edges of the
objects in
the photo shown in white. Then hit "negative" and you end
up with
a neat little black-line drawing of whatever was in the
photo. If
you begin with a really clear photo image, you can be ready to
print in
seconds! In most cases you'll still want to clean it up a
little
first, but it works really well.
Using this method, you may find it helpful to edit a
photograph before
applying the edge
detection. Let's say there's a feature in the photo that
you can
make out, but the computer barely notices it when doing the edge
detection and therefore leaves you with a blank area or a faint
smudge. Before doing the edge detection, you can edit the
photo
by simply manually drawing lines right where you want them, as
though
you're outlining or highlighting the features. Sure,
the
photo looks silly -- but now when you do
the
edge
detection step, it'll find bright, crisp edges -- the edges of
the
lines you drew.
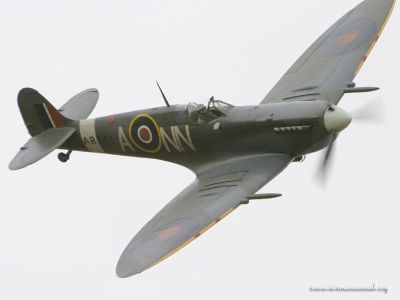
Finally, there's the manual method of outlining. Since
this is
the method I use almost exclusively, I will describe the process
in
excruciating detail. First, select a suitable photograph;
I recommend a very high resolution photograph, especially if the
subject has lots of fine details. For my airplane and car
stamps, I usually insist on 1024x768 resolution as a minimum,
and will use higher resolution yet if I can get it! Also,
make sure the photograph includes the entire image you want to
use; you'd be amazed how many photos of airplanes have wingtips
cropped off, or helicopters with the rotor tips missing.
You might be able to draw them in by hand, but it's usually
easier to just find a better photo to work with.
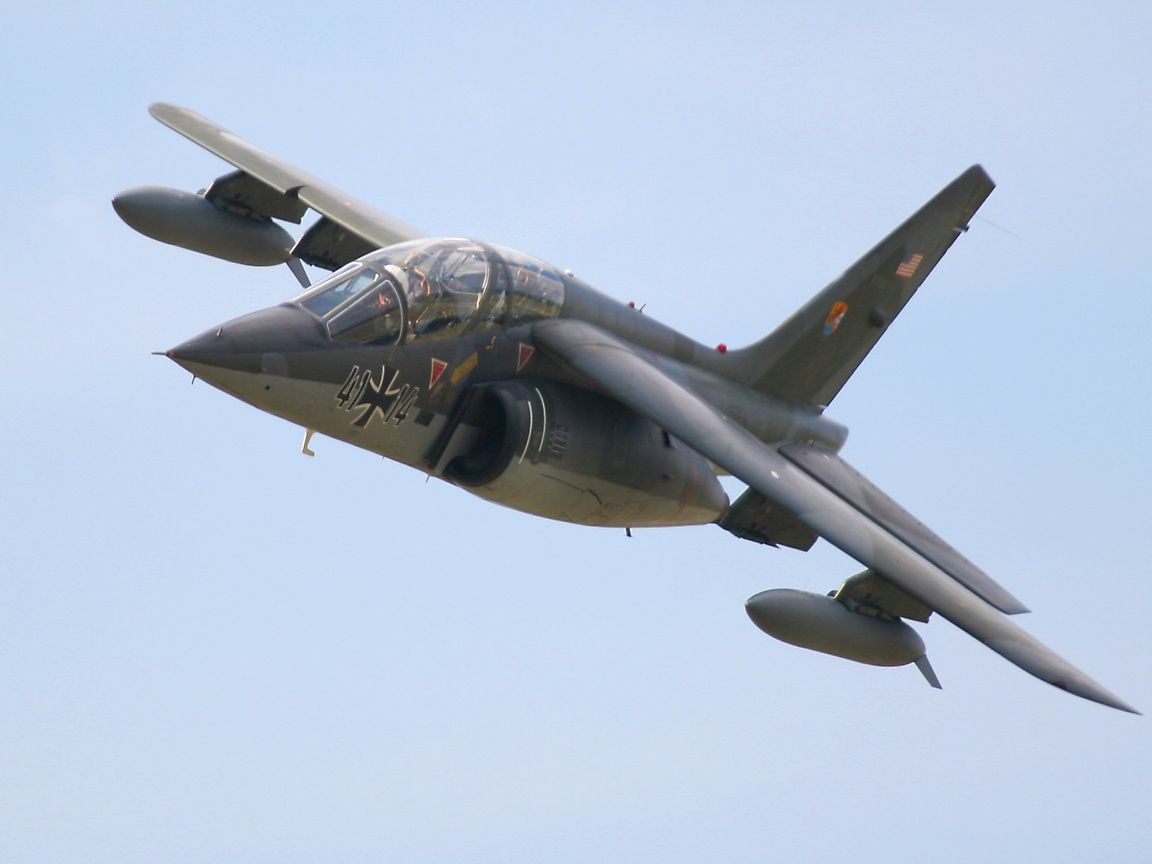
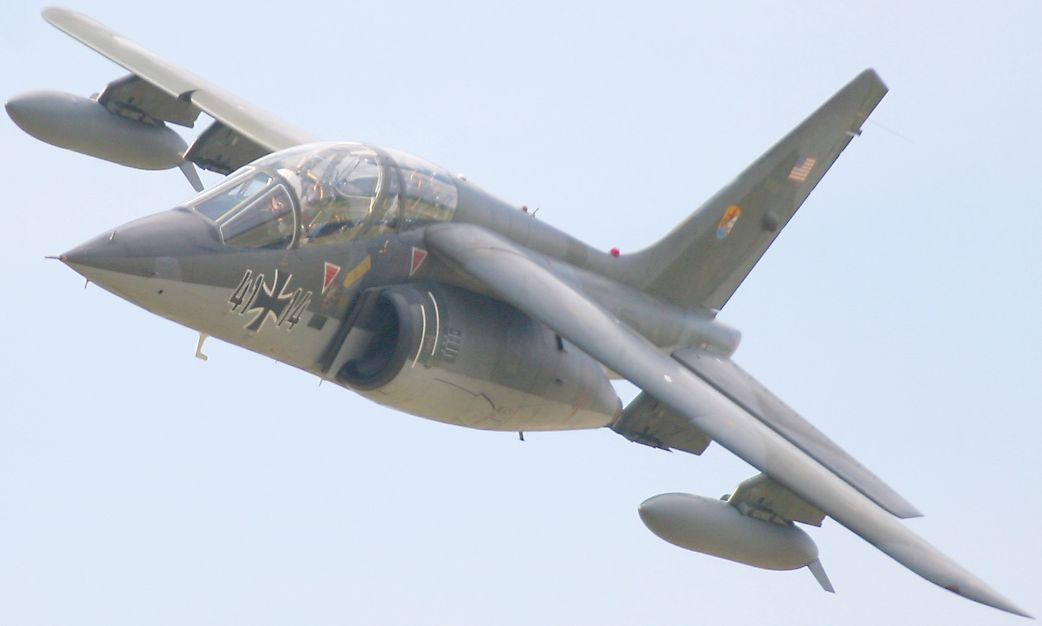
Using MS Paint
or Irfanview,
open the photograph; We'll use this nice photo of a Dassault jet
as
an example:
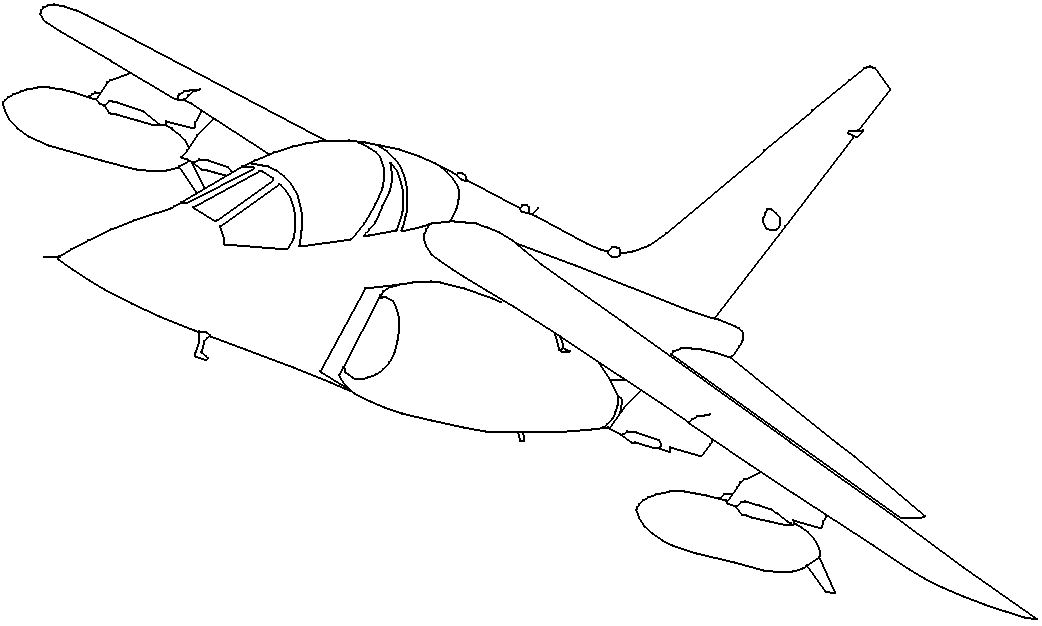
Next, crop the photo to just outside the area that you intend to
feature in the stamp image -- in this case, we're looking at the
jet
itself and not at all that blue sky surrounding it. In
Irfanview,
to crop you select the rectangular area you want -- you can
adjust the
edges after your initial selection -- then click "Edit" and
"Crop
selection." Also, some areas of this jet are a bit dark
and
difficult to see, so adjust the gamma up a bit to help make the
dark
areas appear more clearly. In Irfanview, this is done by
clicking
on "Image" then "Color Corrections" and sliding the gamma
adjustment to
the right. The result looks like this:
Looking pretty is not the objective here. The idea is to
make the
details visible; if you'll look at the areas under the wing,
you'll see
how those areas are now much easier to see. Note that, in
Irfanview, you can select an area of the photo and then adjust
the
gamma within that area alone. The result really looks
weird, but
it can make the details clear when some are in dark areas while
others
are in areas so light that they will disappear if you lighten
the
entire image.
Save the resulting image as a BMP file. You probably don't
want
to overwrite your original image -- you might want to start
over, or
you may just want to save the original photo for your
records. A
BMP file takes up a lot of space on your hard drive, but it
doesn't
lose resolution with repeated alteration and saving the way a
JPG file
will. The example shown above is actually a JPG file, but
that's
merely to save time and bandwidth when viewing this web page.
You can perform this next step in Irfanview by clicking on
"Edit" and
"Show Paint dialog", but I personally close Irfanview at this
point and
reopen the image in MicroSoft Paint; it just works a bit quicker
and
smoother for me. Note, though, that Paint has two
significant shortcomings: First off, you can only "undo"
three steps. That's just pathethic; 30 steps would have
been more reasonable, and being able to undo all the way back to
your last save would be ideal! As it is, be sure to save
often at points where you know you're happy with what you've
done up to that point. That way, should you realize you've
really messed up your last ten steps, you can just close it and
reopen, starting over at the last place you saved without
wasting too much time.
The other shortcoming is that, while you can zoom in 2X, 6X or
8X in Paint, you cannot zoom out at all. If the photograph
is larger than your screen, you'll have to pan around on
it. This can occasionally prove problematic, such as when
you want to draw a circle that is larger than your screen.
For me, these shortcomings are irritating but not so much that I
quit using MS Paint.
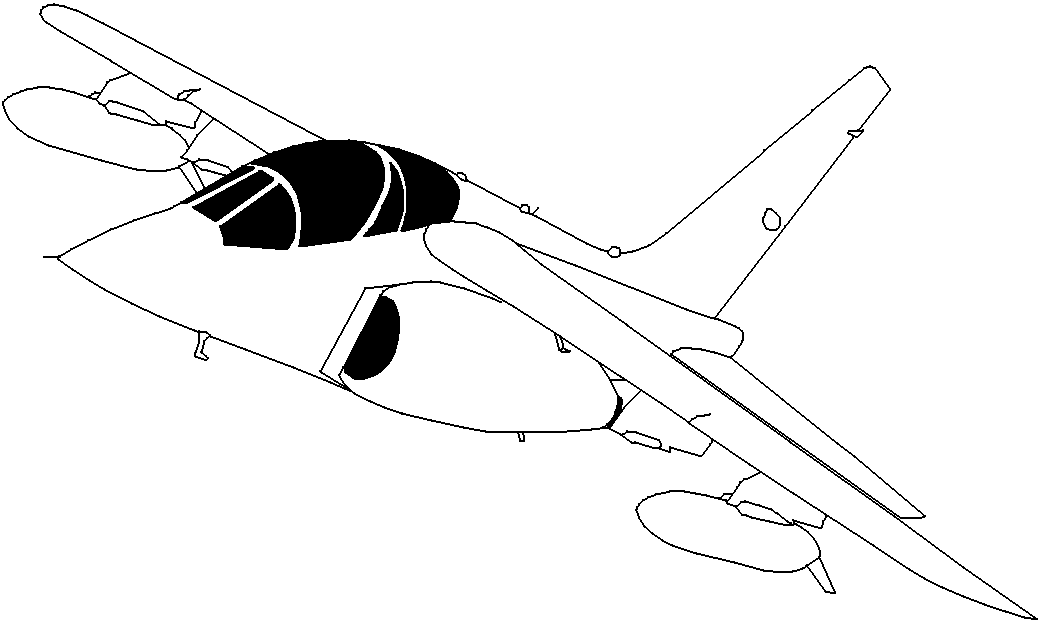
Select the straight line drawing tool, and
select a line width that is at least two pixels wide. If
the
photo you're working on is really big -- bigger than your
monitor,
you're having to scroll around on it to see it all -- and you
plan on
printing the finished image as a 2" stamp, you may need to go to
3- or
4- pixel wide lines to avoid them completely disappearing when
the
image is reduced that much for printing. Looking over the
photo, choose a line
color that
doesn't appear in the photo as your color to draw with. I
chose
dark blue for this one, but purple or green might have worked
just as
well. Then draw
lines over top of the photo. To draw a curved line, merely
follow
the curve on the photo while making a series of very short
straight lines with each line starting from the end of the
previous
one. Save periodically, making sure to
save as a BMP file; if you save as a JPG, you'll lose image
quality
with each save. Remember that either MS Paint or Irfanview
allow you to zoom in, making the outlining of detailed areas
easy. When done, your finished image should look sorta
like this:
Again, the above is actually a JPG file just to make this page
load
quickly.
You'll want to use discretion in your outlining. Most
photos will have details that you'll want to omit from the
stamp. Sometimes I'l be working with a photo of an
airplane parked on the tarmac, but I want the image to show it
in flight, so I'll omit outlining the landing gear and depict
propellers moving rather than stationary. I'll typically
include all the physical details I can, but I'll usually omit
paint markings -- except that I'll sometimes include military
insignia. Some details would do little more than clutter
up an image; in general, if I think a stamp will look better
without it, I'll omit it.
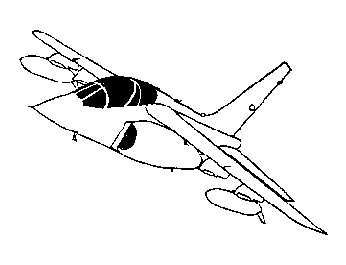
When you're done drawing lines all over the photo, save the BMP
file
and reopen it in Irfanview. Select "Image" then "Decrease
Color
Depth" and
tell it to decrease the number of colors to 16.
Then select
"Image" then "Palette" and "Edit Palette" and double-click on
each
color and change it
to white, except for your selected outlining color; change that
one to
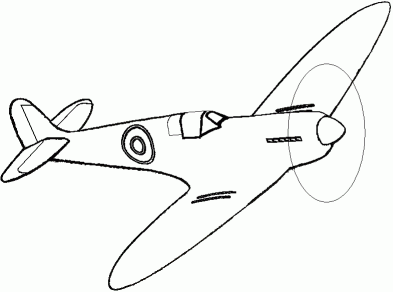
black. Save that resulting image as a TIF file, or a GIF
file, or
a BMP file, scarcely matters which. The result looks like
this:
This is the image to transfer onto the rubber for carving.
However, you can easily get an idea what the finished stamp
image will
look like by using the "Fill with color" tool to click on areas
you
intend to leave black -- that is, you won't be removing rubber
-- to
create a simulated stamp image:
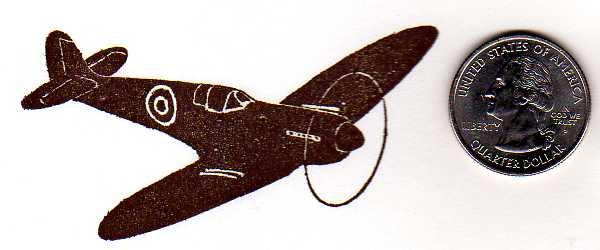
Now you just need to get to it and transfer the outline to
rubber
and start cuttin'. This is the actual stamp image for the
Alpha
Jet:
This is a very time-consuming process; you're basically tracing
the
image digitally. I'll spend an hour or more on the tracing
alone,
and I'm practiced at it. But it allows you to ignore what
you
want to
ignore and add stuff in if you want. It also allows you to
zoom
in on the photo for detail work. If you accidentally leave
some
lines out,
it's easy enough to go back to the BMP file, add them in, and do
the
palette editing over again.
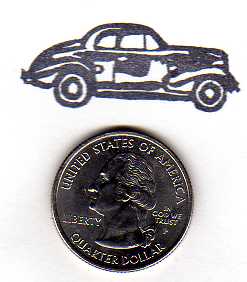
IMAGE SIZE
As long as the image is on the computer, you can choose to
make
your rubber stamp any size you'd like -- or whatever size fits
the
piece
of rubber you have on hand. I recommend starting with big
designs, like 2" square or larger. It's easier to make a
big
design look good. It takes skill to make a 1" x 2" (eraser
size)
rubber stamp look impressive, and more skill yet with something
really
tiny.
Regardless of your carving skills, you'll always find that
some images are too intricate and too detailed to be carved too
small. What may be less obvious is that some images can be
made
too large; some things that look really cute when they're tiny
just
don't look as good when they're made bigger. It may be
helpful to
print the image out on paper in a few different sizes so you can
look
them over before you decide how large to make your rubber stamp.